Manufacturing
Manufacturing tracks how you turn parts into finished products. A BOM (bill of materials) lists the parts in a product and the steps to make it. A work order is one production run: it takes the parts out of stock and puts the finished product in. The Floor Kiosk lets the people on the shop floor run the work orders, and the Live Board shows everyone what's running.
Manufacturing needs Advanced Inventory, because it works on inventory items. It's included on a trial and on the current plans. If there's no Manufacturing group in your sidebar, it isn't turned on for your store: check Billing or ask support.
To take a customer's order from payment to the shop floor and out the door, follow Run a build-to-order job.
Where things are
- Manufacturing → Work Orders: every production run. Its top bar also has Live Board, Floor Kiosk, Operators, Downtime and + New Work Order.
- Manufacturing → BOMs: what goes into each product, and the steps (operations) to make it.
- Manufacturing → SOPs: written instructions with photos.
- Manufacturing → Jobs: batches within work orders.
- Manufacturing → Work Centers: your machines and work areas.
- Manufacturing → 3D Printers: 3D printers connected with Machine Connect, and what each one is doing.
- Manufacturing → Live Board and Manufacturing → Floor Kiosk: full-screen pages that open in a new tab.
- Manufacturing → Cost Centers: hourly rates for costing (see Cost and pricing).
Work centers
Manufacturing → Work Centers is the list of machines and work areas your jobs are done at (CNC Router, Plasma, Welding…). Work orders, BOM operations, shop-layout zones, the Floor Kiosk's machine list and the downtime report all pick from it, so the names always match.
- Add a work center by name and click Add. A name typed with + New work center… on a work order or BOM operation is added too.
- Each one shows what uses it (open work orders, BOM steps) and its zone on the shop layout, with a link to tie a floor area if it has none.
- Rename fixes the name on every work order, operation, BOM step, zone and downtime entry at once. Renaming onto an existing name merges the two.
- Remove takes it off the list once nothing uses it.
- Hours sets when someone is at the work center, one opening and closing time per weekday (for example Mon–Fri 08:00–17:00, Sat 09:00–12:00), in your store's timezone. Leave a day empty when nobody's in. Until you set them, a work center counts as staffed Mon–Fri 08:00–17:00. The print queue uses them: a printer only starts a plate when someone could clear its bed. Below the hours, Tell us when the 3D print backlog passes … days (3 by default) sets when you're alerted about this work center's print queue.
Bills of materials (BOMs)
A BOM lists the parts (components) needed to make one unit of a finished product.
Creating a BOM
- Go to Manufacturing → BOMs and click + New BOM.
- Pick the Finished Product (the inventory item you'll make).
- Give it a BOM Name (for example "Standard Assembly v1") and any Notes.
- Choose the Sub-Work Order Mode (see Sub-work orders).
- Under Components, click + Add Component for each part: search for the item and enter the quantity per unit. A part made straight from a print file, like a 3D print, needs no components: leave the list empty, save, then add the print step and its file on the BOM's page.
- Click Create BOM.
The BOM's page shows each component's Qty per Unit, Unit Cost, Line Cost and In Stock, with the Total Component Cost. A component with its own BOM is marked Has BOM.
Operations (routing)
Operations are the steps to make the product, in order: cut, weld, coat, assemble. Each work order made from the BOM gets the same operations, and the shop floor works through them one at a time.
On the BOM's page, under Operations (Routing), click Add Operation and fill in:
- Operation Name
- Link to SOP (optional): the written instructions for this step
- Estimated Time (minutes)
- Work Center: the machine or station this step runs on. Each work order's operation gets it, so the Floor Kiosk shows the job on that machine's list.
- Cost center: the hourly rate used for costing; leave it blank to use your default
Edit and Delete are on each operation.
Changing a BOM
Edit BOM changes the components, the mode and whether it's Active. A BOM with active work orders can't be edited. Make a new version instead: New Version copies the BOM as the next version and opens the copy for editing. Untick Active on the old one when the new one replaces it.
Create Work Order on the BOM's page (or Create WO on the BOMs list) starts a work order from it.
Order short components on the BOM's page (under Quick Actions) works out what you need to build the number you type, and puts the components that are short, or would drop to their reorder point, on the Purchase List. Components with enough stock, or already on the list or on order, are skipped.
Design files
Each part can keep its cut files, machine programs, drawings and CAD files, by revision, so the floor only ever gets the approved version. Open the part from Inventory → Items and scroll to the Design files card.
Add files. Choose Add files, pick up to 20 files and up to 60 MB at a time, and add the type, work center, material and thickness if they apply. The first upload starts a draft, called revision A, then B, and so on. Nobody on the floor sees a draft.
Release. Click Release revision A. The next page lists the files, plus the BOMs and open work orders that use this part. Add what changed and, if the original lives in a CAD or PDM system, a link to it, then release. The last released revision moves to Earlier revisions. Only owners and admins can add or release files.
Changing a released file. A released revision can't change, so you always know what it contained. Upload the new file to start a new draft and release that. To go back, open Earlier revisions and click Go back to this revision: that makes a new revision with the same files, ready to release.
Who sees what. Staff can download the files of the released revision, except CAD source files. Owners and admins see everything.
Parts that need a file. Uploading a file marks the part as needing one, and until a revision is released it shows No released file on its page and on BOMs that use it. To mark a part before you have the file, or to clear the mark, use the This part needs a file checkbox on the card. Parts that aren't marked, like bought hardware, are never flagged.
On a work order. The work order page lists the files for its item and components. Start Production warns you if a part marked as needing a file has none released, and you can still start. Starting fixes the revision of each part for this job, so a later release doesn't change it. The page tells you when a newer revision exists, and Move to rev changes the job with a reason on record. Parts already cut stay as they are. The printed work order lists the files too.
Download all (.zip). Once a job has started, Download all (.zip) on the work order page or the Floor Kiosk gives you every file the job uses, with CAD source files left out. On the kiosk you get the files for the selected work center, plus any not marked for one. Each material and thickness has its own folder, so you can load one folder into your nesting software, set each quantity from the file name, nest it, and move to the next. Cut files are named like A36-0-188_BRK-100_revC_qty12_bracket.dxf. Other files go in programs, drawings, models and other, and MANIFEST.txt lists everything, including parts with no released file. To leave quantities out of the names, untick the box on the work order page: it applies to the whole store. A zip can't be recalled, so if a job moves to a new revision the page says who has an earlier zip.
Storage. Each store has 5 GB for design files to start. The card shows how much is used. The same file saved under two names counts once. At the limit, new uploads are refused, but downloads and releases keep working. If you need more room, ask us.
Cut batches
Manufacturing → Cut Batches gathers what needs cutting, so you can nest it all at once instead of one job at a time.
Adding to a batch. Use Add to cut batch on a started work order, which adds its parts that have cut files, or on a Kanban card, which adds its restock quantity. You can also type a SKU and quantity on the Cut Batches page. The part needs a released cut file. It joins the open batch for the work center its cut files are marked for, and a new batch opens if there isn't one. A part with cut files for two work centers joins a batch for each, and each gets that machine's files, plus any not marked for a work center.
The batch page adds each part up across everything that needs it, shows where the demand came from, and totals the parts per material and thickness. Remove takes a line back out while the batch is open.
Start cutting fixes what's in the batch and its revisions. Anything added after that goes in the next batch. A work order's parts stay on the revision that work order uses, and other parts use the release current when you start. If one part appears on two revisions, it shows as two lines, and each has its own file.
Download all (.zip) appears once a batch has started. It's laid out like a work order's zip: one folder per material and thickness, with the batch's combined quantity in each cut file's name. Load a folder into your nesting software, nest it, and move to the next.
Mark as cut records that it's done. It doesn't move stock, which stays with the work order or receiving. Cancel batch calls off a batch that hasn't started, and its work orders and cards can then be added to another.
Bid requests
Send parts out for prices, with the drawings, from Inventory → Bid Requests. Owners and admins only.
- Click + New bid request, or Request bids on a part's Design files card. Add a title, a reply-by date, notes for suppliers, the parts and quantities, and the suppliers. Suppliers need an email address. Nothing is sent yet.
- Open the draft and click Review and send. The next page lists who it goes to and exactly what they'll be able to see. Click Send to. That fixes the revision of each part for this request.
- Each supplier gets an email with a private link and no login. They see the parts, quantities, drawings and your notes, can click Download all files (.zip), and enter a price per part, lead time and notes, or decline. They can change their quote until you close the request. They can't see other suppliers, and CAD source files stay private. If you've set a contact email in your settings, you get an email each time one answers.
- Under Compare and award, prices show side by side with the lowest marked. Pick a supplier for each part and click Create draft purchase orders. That makes one draft per supplier at those prices and on the revision that was bid. Nothing goes to any supplier until you send each purchase order, and other suppliers aren't told.
If an email doesn't go out, the page says so. Each supplier's private link is on the request, so you can copy it and send it yourself, or click Send again.
If a part changes after it goes out, the request stays on the revision that was sent and the page tells you. Use Copy to a new request to bid on the new one.
Ending access. End link stops one supplier's link. Close stops them all. Links also end 60 days after the reply-by date.
Purchase orders. Sending any purchase order fixes the revision of each part. If a part has files, the email includes a private link to them, and the purchase order page shows the link and flags a newer revision. The link keeps working until 60 days after the order is received or cancelled.
Standard operating procedures (SOPs)
SOPs are step-by-step instructions with photos. Link one to a BOM and its steps appear on that BOM's work orders as a checklist.
- Go to Manufacturing → SOPs and click + New SOP.
- Enter the SOP Name, optionally Link to BOM, and a Description. Click Create SOP.
- Click Edit SOP, then + Add Step for each step: Step Title, Description, Estimated Minutes and a Photo (optional). Click Save Step.
Use the ▲ and ▼ arrows to reorder steps; they renumber themselves. Delete removes a step.
Work orders
A work order is one production run of a product.
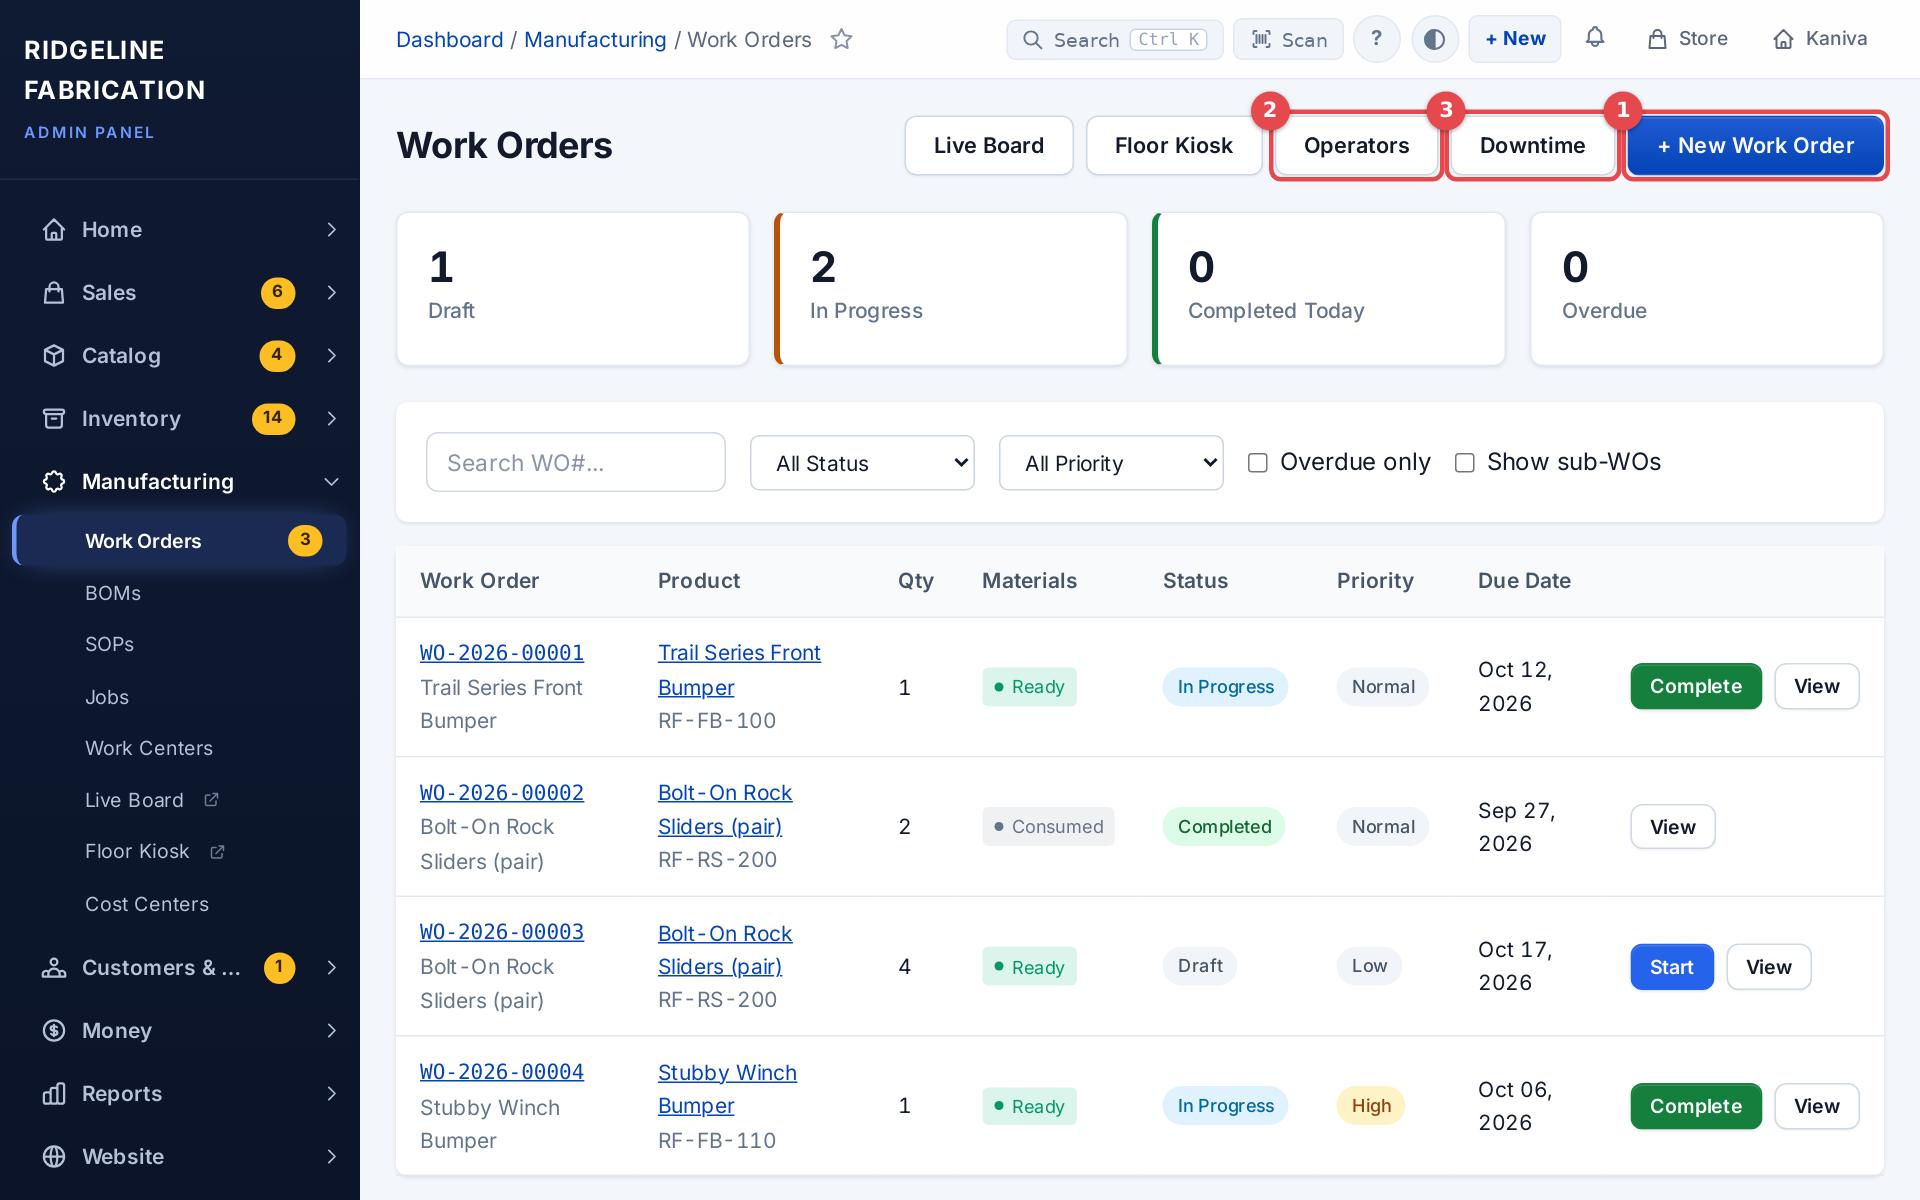 The Work Orders list with its counts and filters
The Work Orders list
Across the top are counts of Draft, In Progress, Completed Today and Overdue work orders. The list opens on Open work orders (drafts and in progress); pick All Status or a single status to see finished ones. Filter by materials (Ready to start or Short), priority (Urgent, High, Normal, Low) or Overdue only, sort Newest first, Oldest first or Ready first, oldest first, or search by work order number. Sub-work orders are hidden unless you tick Show sub-WOs. The list remembers the filters and sort you used last, per person, so it opens the same way next time; Clear goes back to the default view and forgets them.
Each row shows the product, quantity, whether the parts are Ready or short, the status, priority and due date. A draft has Start; one in progress has Complete.
Statuses
| Status | Description |
|---|---|
| Draft | Planned. It can be edited. |
| In Progress | Production has started |
| Completed | Finished; parts taken out of stock and the product added |
| Cancelled | Called off; no stock changes |
Creating a work order
- On Manufacturing → Work Orders, click + New Work Order.
- Pick a BOM under Create from BOM, or a product under Or Select Product Directly. Choosing a BOM fills in the components.
- Enter the Quantity, Priority (Low, Normal, High or Urgent) and an optional Due Date.
- Optionally Assign To a person and set the Work Center (the machine or station for the operator's job list).
- If some components have their own BOMs, a Sub-Assemblies Detected box appears: tick the ones you want sub-work orders for.
- Add Notes if needed and click Create Work Order.
Work orders for customer orders can be created for you; see Work orders for customer orders.
The work order page
- Print gives a work-order sheet for the shop floor: product, quantity, due date, the customer order if there is one, and the operations and steps with Done and Initials boxes.
- Edit (drafts only) changes the product, quantity, priority, due date, assignee, work center and notes.
- Assigned To: pick a person, or Other (type name), and click Save.
- The line at the top says where the order stands: Ready to start (and whether the parts are already in its work zone), Waiting on … with what is short and why, or In production with the operations done so far, with the product, the customer order and the due date under it and the Start Production or Complete button beside it. Print pick slip on the Components card prints just the parts to pull, with units and bins.
- Components shows what's needed and in stock for each part (and, once production has started, what's consumed), in the part's own unit (inches, each, sheets…), with its home bin and the BOM line's note (for example "2 x 9" lengths") so you know what to pick or cut.
- Work zone shows whether the parts have reached the work center (see Work zones).
Component shortages
If there isn't enough stock of a component, the page lists Component Shortages and Start Production is greyed out until the stock is there. Stock is handed out first come, first served: work orders already in progress come first, then drafts in the order they were created. So when several work orders need the same part, the earlier ones can start and only the ones the shelf can't cover show short, with a note of how much is spoken for by earlier work orders. The item's own page shows, under its stock numbers, how many open work orders need it, the total, and how much you are short. The Ready / Shortage column on the work-order list, the live board and the floor kiosk follow the same rule, and a work zone only counts parts as in when an earlier work order isn't already waiting on them.
When a short part is on an open purchase order, the shortage says so, for example on order on PO-2026-00012 (expected Nov 12), with a link to the PO. Add short parts to purchase list under the shortages puts each short part on the Purchase List for what it's short of (at least its restock quantity). Parts already on the list or on order are skipped, and the message says how many.
Starting and running production
- Click Start Production. The status changes to In Progress.
- If the work order has Operations, work through them in order: Start an operation, then enter the Good and Scrap quantities and click Complete. The next operation waits for the one before (Waiting for previous operation). skip passes over an operation that can be skipped.
- If it has Production Steps (from a linked SOP), tick each step as it's done. The page shows who did each one and when.
Most shops run this part on the Floor Kiosk instead.
Completing a work order
Click Complete. Kaniva then:
- takes the components out of stock (from the work zone first, then each item's home bin)
- adds the finished product to stock
- records both as stock movements, shown under Recent stock movements on each item's page
Cancelling
Click Cancel and confirm. Draft and In Progress work orders can be cancelled. No stock changes.
Work zones: parts at the work center
With Inventory → Shop layout set up, tie a floor area to a work center (select the area, fill in Work center). That area is the work center's work zone, and Kaniva then knows when a work order's parts are there:
- A work order's parts are in its zone when every component it still needs is on that floor area, or in a bin, tote or cart placed there. The zone that counts is the current operation's work center, else the work order's.
- When the last part arrives for a work order that hasn't started, it's ready to start. Everyone with push notifications on gets "WO-0042 is ready: All parts are in Router", and it's logged. It's announced once; if parts leave again it quietly stops being ready.
- The Live Board shows each job's parts (✓ in Router, or 2/5 in Router) and a Ready to start count. The Floor Kiosk shows the same on each job.
- The work order page has a Work zone card: what's still to bring and where it is now (for example At A-03-2 (12)), or how to set up a zone if there isn't one.
- Completing a work order uses the parts in its zone first, then the item's home bin, so stock counts per location stay right.
Sub-work orders
When a component has its own BOM (a sub-assembly), you can make child work orders for it and track them separately.
Modes
Set the mode on each BOM (Sub-Work Order Mode):
| Mode | Behavior |
|---|---|
| Independent | Children are standalone. The parent starts and completes whatever they're doing. |
| Auto-start children | Starting the parent starts its draft children too. |
| Block parent until complete | The parent can't start until every child is completed or cancelled. Use it when sub-assemblies must be done before final assembly. |
Creating them
When you create a work order from a BOM whose components have their own active BOMs, Sub-Assemblies Detected lists them with their BOM and quantity per unit, all ticked. Untick any you don't want. Quantities are worked out from the parent's quantity.
Following them
- The parent's page has a Sub-Work Orders card with each child's status and progress ("2/3 completed").
- Children show a Sub-WO badge and link back to the parent.
- On a blocked parent, Start Production is greyed out with a note saying why.
Jobs
Jobs split a work order into batches, for example one per shift, and record the good and scrap quantity of each.
- A work order with operations gets a job per operation automatically.
- On an in-progress work order without operations, use the Jobs card: enter a description and notes and click + Add Job.
- Manufacturing → Jobs lists every job, with Start, Record (good and scrap quantities) and View.
Live Board
The Live Board shows every active work order on one screen, grouped by work center, for a TV or monitor on the shop wall. Open it from Manufacturing → Live Board; it opens full-screen in a new tab.
Each work order shows whether it's running, paused, down (with the reason), blocked by a shortage (with the open purchase order a short part is coming on and its expected date, when there is one), or not started, with the operator, active minutes, good and scrap against the target, progress and due date. Counters across the top total each state, counting each work order once. A job being printed counts as running whoever sent its plate (Start or Auto), with Printing on AD5X 1 · 34% on its card; a paused plate makes it paused; a print job that needs a person (a plate to inspect or check, or its next plate waiting for a bed to be cleared) shows Needs attention, with its own counter; one whose plates are only queued for a printer shows Waiting on printer. Print jobs show Printed (time on the printer) instead of Elapsed: a work order started by its first print opens no labour timer, and the timer Start Production opens doesn't make a print job count as running. A timer someone starts on a step (sanding while plates queue) still does. A started job with nothing running right now counts as paused, never as not started. The board refreshes itself every 10 seconds. It shows what operators record on the Floor Kiosk, so it's only as live as the kiosk use on the floor.
If you've connected printers with Machine Connect, the board also shows a Printers row: each printer's state, file, layer, temperatures and loaded material, straight from the printer. A printer whose agent has stopped calling in shows No signal, dimmed with a dashed edge, and a printer the agent can't reach (or no longer lists) shows Printer offline in red, so neither is ever mistaken for idle. The row's heading counts the printers (1 printing · 2 idle · 1 offline or error); they aren't added to the job counters. Above them, a line per work center says when its print queue clears.
Machines (Machine Connect)
Machine Connect is a small Windows app that runs on a PC on the same network as your 3D printers (FlashForge AD5X to start with) and reports them to Kaniva. It is being piloted; ask support if you'd like to try it. It reports each printer's status, and prints plates from work orders once a person has pressed Start and marked the bed clear (see Printing from a work order).
Connect the agent
- Install Machine Connect on the PC and start it. Get it from Download Machine Connect at the top of Manufacturing → 3D Printers or Settings → Printing (owners and admins). Each PC under Agents shows its version, with Update available when a newer one is out and Unsupported, please update when it's too old to keep working. It shows a code like KMC-7F4Q-M2XB and a link.
- Open the link, or go to Manufacturing → 3D Printers and type the code under Connect an agent. Only the store owner or an admin can do this. The link asks which store to connect to if you have more than one.
- Click Connect agent (or Connect). The agent picks this up within a few seconds. Codes last 10 minutes; if one runs out, start pairing again on the agent.
- Add your printers in the agent. They appear on Manufacturing → 3D Printers as soon as it reports them.
The agent can report this store's printers and their status, nothing else: it can't see orders or customers.
The approval page shows the PC's name, its internet address and when pairing started. Only connect it if it's your PC and you started pairing just now; otherwise click Decline. After 10 wrong codes in 15 minutes the page stops accepting codes from you for a while.
Moving a printer to a new PC: each printer is connected through one PC at a time. Remove the old PC under Agents on Manufacturing → 3D Printers first; until then the new PC shows the printer as connected through the other PC and doesn't report it. The printer keeps its name, work center and history.
The Machines page
Each printer shows its state (Idle, Heating, Printing, Finished, Error, Printer offline, No signal…), the file, progress, layer, nozzle and bed temperatures, and the material in each slot. The page refreshes itself every 15 seconds.
Owners and admins click Edit on a printer to rename it, set its Work center (for example Print Farm), put it on hold with a reason, or tick Available for print jobs. Only printers ticked here and not on hold take plates. Click a printer's name to open its page.
Agents lists each connected PC, whether it's online, and when it last called in. Remove cuts an agent off at once; pair it again to reconnect it. Staff can see the page but can't change anything.
Printing from a work order
Kaniva never starts a printer on its own. A plate prints only when someone presses Start on it, and only after someone at the printer has marked its bed clear. Each clearance lets one plate start; after every print the bed has to be cleared again.
-
Add the print file. On the BOM (Manufacturing → BOMs, open one), the Print files card lists each operation. Upload the sliced plate as a .3mf: in the slicer, Slice plate, then Export plate sliced file, one plate per file. A project save (the plain Save project .3mf) is refused because it has nothing a printer can run. Kaniva reads the printer model and nozzle size it was sliced for, plus the time, grams and filaments. Check Parts per plate, Material, Color and Sliced for (the printer models), then click Approve. Color starts at Any color (any color of that material). The list also offers the colors loaded in your printers right now, with where each one is (#2750E0 PLA · AD5X 1 slot 1), the slicer's color (marked if no printer has it loaded) and Other color… for a color picker. Only pick a color if the plate must print in exactly that color: the printer then needs a slot reporting that exact color, which is why the loaded ones come first. Only owners and admins can upload and approve. A new upload is a new revision; approving it retires the old one. Multi-color plates (the AD5X's 4-slot station): slice with each filament, then export the plate sliced file as usual. The approval form lists each tool with a color list: its Slicer color (the default), Any color for a tool whose color doesn't matter (supports, hidden parts), the colors loaded now, or Other color…. Each tool prints from a slot holding its color, so a two-color part can't come out swapped. If a color isn't loaded, the printer's page says so, for example Waiting: no PLA #000000 loaded for tool 2. Tip: sync the filaments from the printer in the slicer, so the colors in the file are exactly the ones the printer reports.
-
Queue the plates. On the work order, the print operation shows Print plates and a Queue … plates button, which covers what's still needed in whole plates.
-
Press Start on a plate and pick a printer, or Next free printer in the operation's work center. The printer must be ticked Available for print jobs and not on hold. With Auto dispatch (below) there's nothing to press: plates go out by themselves.
-
Clear the bed. At the printer, scan its label (or open it from Manufacturing → 3D Printers). Tick the checklist (parts removed, plate seated, nothing in the way) and tap Mark bed clear. This is refused while the printer is busy, still shows a finished print (press OK on the printer's screen first), shows an error, or Kaniva can't see it.
-
The printer's PC picks up the plate, sends the file and starts it. It only does so if the printer is idle, the file is approved for that model and was sliced for that printer and its nozzle size, and the right material (and color, if set) is loaded. If the PC finds something wrong before it has touched the printer, it gives the plate back and the bed clearance still counts. While a plate is on its way to the printer or printing, the bed shows In use, plate N; once the plate is off the machine (printed, failed or cancelled) it shows Needs clearing. If a plate is waiting and the printer doesn't take it, its page and Manufacturing → 3D Printers say why, for example Waiting: no PLA #FFFF80 loaded, Waiting: nozzle 0.4 mm, file needs 0.6 mm or Waiting: bed not marked clear. The work order's operation starts when the printer starts printing, and so does the work order itself if nobody has pressed Start Production yet: it starts exactly as the button would, with the same checks. If it can't (a component is short), the print carries on and the work order says Printing, but the work order couldn't start, with the reason; press Start Production once it can. If the printer reports anything else after you clear the bed, the clearance no longer counts.
-
Inspect. When it's done, the plate shows Printed, to inspect on the printer's page. Enter Good and Rejected. They go on the operation's job; once enough good parts are in, the operation completes as if you'd pressed Complete, and so does the work order when it has nothing else to do: its parts go into stock (the plate whose save does this says Last plate: saving completes WO-…). A work order with steps after printing (sanding, assembly) carries on to those. A finished print on its own completes nothing.
Right after, the printer's page says WO-… is done with what's next: Print N labels (one per part), One bag label (Qty N) (a single label with the quantity on it, for a bag or box), Put away into a bin (the Scan page opens with the part and quantity ready: scan the tote or shelf bin and they move there from where they went into stock) or Done. To have the labels print by themselves, set Labels when printed parts go into stock on the item's Edit page (One label per part or One bag label with the quantity): they go to the labels printer on Settings → Printing as soon as the inspection puts the parts in. A plate stopped on the printer's screen after it started printing asks too, with Rejected filled in with the whole plate: save it as is to scrap the plate, or count anything usable as Good. The parts it was meant to make still need printing, so the work order offers to queue another plate.
Auto or Manual. Each print operation's plates go out one of two ways, chosen under Plates go out on the BOM's Print files card:
- Manual: someone presses Start on each plate (the default).
- Auto: queued plates are released straight away, and the first free printer in the work center that has the right file, nozzle and material takes the next one as soon as its bed is marked clear.
Auto needs the step to have a work center: without one no printer would take its plates, so Kaniva won't set it, and with Auto as the store default those plates wait for Start instead. A plate sent to a particular printer goes before the rest on that printer; then high-priority plates, then the oldest.
Either way a plate never starts until someone at the printer has marked the bed clear. An Auto plate also waits until the work order's earlier steps are done. To let a print step go at the same time as the steps before it (parts that don't depend on each other, like a body and a lid), tick Print alongside earlier steps next to it on the Print files card. Store default uses the setting under Print settings on Manufacturing → 3D Printers, where owners and admins also find Backorders print first (on by default): plates for high-priority work orders (a customer is waiting) go first, then the oldest. Turned off, plates go first come, first served. A print that's already running is never interrupted.
Restock by printing
A printed part you keep in stock can restock itself. Open its inventory item (Inventory → Items, then Edit) and tick Restock by printing under the trigger level. It needs Manufacturing and an active BOM with an approved print file.
- When available stock (on hand, less what's held for orders) plus what's already being printed falls to the Trigger Level, Kaniva makes a work order for whole plates: the Restock Quantity, rounded up to whole plates (at least one plate). It's started straight away and its plates are queued; with Auto dispatch they go out by themselves. If a component (such as filament) is short, the work order waits as a draft and starts once there's enough.
- Plates already queued or printing count as coming, so a second sale doesn't add another plate.
- It only works while the item can actually be printed: an active BOM with an approved print file. If the file is retired or the BOM made inactive, the product is out of stock again at zero (no backorders) until that's fixed.
- Most backorders per item (under Print settings on Manufacturing → 3D Printers, 20 by default) caps how many units customers can order ahead of stock. Above it, the cart and checkout say how many can be taken right now, before any card is charged. Orders already placed are never changed. The cap is for shoppers: an order you make or edit in the admin can go over it.
- Backorders: the product stays buyable at zero stock, and shows Printed to order in your storefront. When a customer is waiting, a restock with plates that haven't gone to a printer yet is raised to high priority instead of adding another; if it isn't enough, a high-priority one is added. With Backorders print first on, those plates print before plain top-ups.
- If you cancel every plate of a restock, the restock work order is cancelled too. If customers are waiting for that item, everyone with push notifications on is told, since it won't restock by itself until something changes.
- If you cancel a restock work order, Kaniva respects it: it doesn't make another for that item by itself until something happens to the item (a sale, a stock change, or you save its settings). The item's edit page shows when it's paused.
- Each plate's good parts go into stock as soon as it's inspected, so a waiting order can be picked and shipped without waiting for the rest of the work order. Rejected parts stay as scrap on the job. When every plate is inspected, the work order completes by itself (and uses up its materials). If some were rejected, the next check prints more if stock is still low.
Print times. Each plate shows the slicer's estimate and the time the printer actually measured, for example est 1h 28m · took 1h 27m. A print operation's time is the sum of its plates' printing time (not when someone pressed Complete). The BOM's Print files card shows what a plate of the file is expected to take: the median of its last 10 prints once there are 3, the slicer's estimate until then. Kaniva also notes when each bed was cleared after a print, so it can learn how long printers wait for someone.
While a plate of an operation is on a printer, or printed and not inspected yet, the operation, its job and the work order can't be completed, and good parts can't be typed onto its job (here, on the Floor Kiosk or through the API). The work order page says which plate is holding it, for example Plate 2 is still printing on Flashforge AD5X 3800. If you really need to finish it anyway, an owner or admin can use Complete anyway… with a reason; the reason goes in the audit log. A plate inspected after its work order was already completed only records its counts: nothing is added to stock twice.
Cancelling. Cancelling a work order also cancels its plates that haven't gone to a printer. If one is already on a printer, stop it on the printer first (it reports itself cancelled), then cancel the work order.
Check the printer. If the PC stops reporting while it's starting a plate, or can't tell whether the printer started, the plate shows Check the printer and that printer takes nothing else. Look at the printer and choose It printed, It failed or It never started (which queues the plate again: under Auto it goes to the next free printer by itself once a bed is cleared; otherwise press Start). A failed print opens downtime on the work center (its work order shows Down on the Live Board), and everyone with push notifications on is told. The downtime ends when you clear that printer's bed or inspect the failed plate.
Printer labels. On a printer's page, Print label prints its name, code and QR on the usual label printer.
The print queue
Kaniva plays the print queue forward to tell you when it will be done. Manufacturing → 3D Printers shows a Print queue card per work center, for example 14 plates on 2 printers · clears tomorrow 3:40 PM (1.3 days of backlog); the same line is on the Live Board and the admin dashboard. Each work order's print plates say prints by Thu Oct 22, 3 PM, and so does each order line waiting on a printer (on the order page), including a backordered print-to-stock product, from the restock printing it.
How it works it out:
- Which plates: every plate queued or waiting for a printer, plus the whole plates open work orders still need. They go in the same order printers take them: priority (with Backorders print first on), plates sent to one printer before Next free printer, then oldest.
- Which printers: those in the work center that are Available for print jobs, not on hold, and can take the file (printer model and nozzle). A printer that's printing is free when its plate finishes (from its progress) and the bed is cleared.
- How long a plate takes: how long the file's last plates kept the printer busy (the median of the last 10, once there are 3), otherwise the slicer's estimate adjusted by how your printers compare with their estimates.
- People time: how long beds wait to be cleared after a print during staffed hours, learned per work center (10 minutes until there's history).
- Print steps in order: when a work order has more than one print step (say Print body, then Print lid), the later step's plates are only counted as starting once the earlier step's last plate is off the printer, the same order Auto sends them in. A step ticked Print alongside earlier steps doesn't wait. A plate you've pressed Start on yourself goes when you sent it.
- Staffed hours: a plate only starts in the work center's hours. The last plate started before closing runs overnight; the printer then waits for the morning. So each printer does one plate overnight.
Plates nobody has started yet (queued and waiting for Start, or not queued at all) are counted as if started now, and the time says so: prints by Thu Oct 22, 3 PM once its plates are started. A plate sent to a particular printer is counted on that printer, even one with no work center. Kaniva works out at most 90 days or 2,000 plates ahead; anything past that shows as beyond what's worked out, and a work order with plates past it shows prints past the forecast instead of a date. A draft work order (waiting to start, for example short of filament) says once the work order starts.
It's recalculated when something changes (a plate starts, finishes or is inspected, a printer is put on hold or its bed cleared, a work order is created, changed or cancelled, stock changes, or hours are edited), and at least every 5 minutes so the times keep up with the clock. Plates no printer in the work center can take are counted separately (2 plates no printer here can take).
Alerts. Everyone with push notifications on is told, once each time it happens:
- Print backlog over N days: a work center's queue passes its threshold (set under Hours on Manufacturing → Work Centers; 3 days by default).
- Promise at risk: a work order will finish printing after its due date or, when it has none, after its order's lead time (counted from when the order was placed). A restock printing for backorders answers to the earliest of the waiting orders.
- Printer waiting for someone: a print finished more than 20 minutes ago (counting staffed hours only) and the bed hasn't been cleared. Change the minutes under Print settings on Manufacturing → 3D Printers.
While a backlog is over or a promise is at risk, the store owner also gets one email a day (from 7 AM store time) listing them.
Live lead time on the storefront
A product that restocks by printing can show shoppers when it will really ship. Turn on Show live lead time under Print settings on Manufacturing → 3D Printers for every such product, or choose per product on its edit page (Inventory tab: Store default, On or Off). It's off by default.
- In stock: nothing changes, normal shipping shows.
- Out of stock (or not enough for the quantity in the cart): the product page and cart say Ships in about N days. Kaniva adds the shopper's units to the print queue behind the orders already waiting, at backorder priority, and plays the queue forward.
- It's never shorter than the product's own Lead Time, if it has one.
- It updates when something changes (a plate starts or finishes, an order is placed or cancelled, stock changes, a printer goes on hold, hours are edited), and at least every 5 minutes.
Products you buy rather than print can show it too, from your purchase orders. Turn Show live lead time On on the product's edit page (Inventory tab); it's Off until you do, and the store-wide print setting doesn't apply to them. When the product is out of stock, its page says Back in stock in about N days, from the Expected Date of the open purchase order bringing it (the soonest dated POs that cover the quantity). A PO with no expected date, or one that's past its date, shows nothing. It's never shorter than the product's Lead Time, and it updates as soon as a PO is changed, received or cancelled.
Floor Kiosk
A full-screen page for shop-floor tablets, with big touch buttons, where operators run work orders. Open it from Manufacturing → Floor Kiosk.
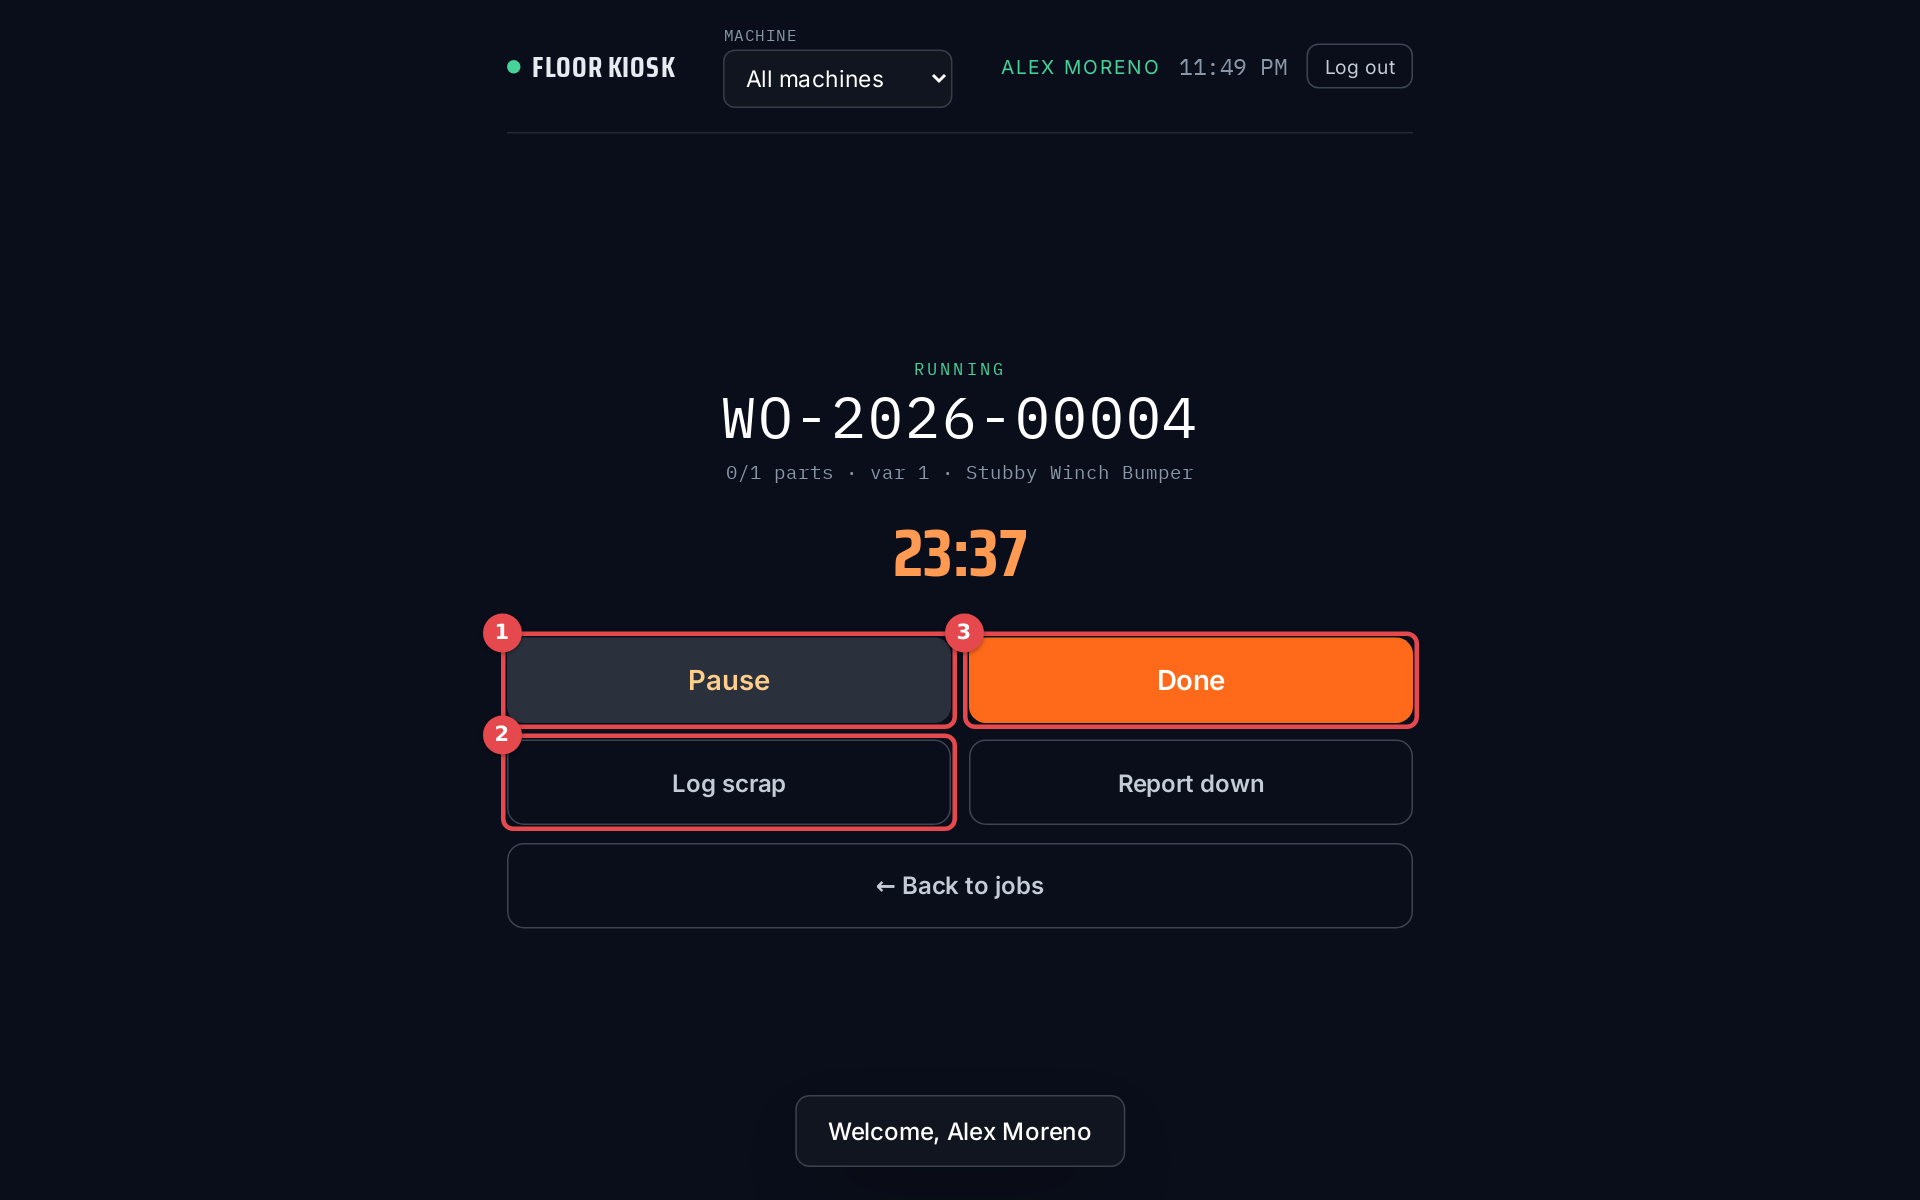 The Floor Kiosk running a job
Setting it up
- Add operators. On Manufacturing → Work Orders, click Operators, then + New Operator. Give each a name and a 4–12 digit PIN, and optionally a Badge ID so they can scan a badge instead. Operators can only use the kiosk; they can't sign in to the admin.
- Set work centers on your work orders, or on each BOM operation, so each tablet can show only its machine's queue.
- Open the kiosk on the tablet while signed in to your store. It stays signed in, and operators log in on top with their PIN or badge.
Operators vs Staff PINs. Settings → Staff & PINs is a different list: 4-digit PINs for shop staff to scan kanban cards without a full admin login. Kiosk operators are set up under Operators on the Work Orders page.
Running a job
- Operator log in: the operator enters their PIN (or scans a badge).
- Pick the Machine at the top (or All machines). Scan the work order's barcode, type its number and tap Find job, or pick an open job from the list.
- Tap Start. A timer runs. Pause and Resume as needed, so labour time is real.
- Log scrap at any time, with a reason and a quantity.
- Report down records machine downtime with a reason (Setup, Maintenance, Material wait, Tooling, Break, Quality hold…) and pauses the job. End downtime when it's running again.
- Tap Done, enter the Good parts produced and confirm. The work order completes: parts come out of stock and the finished product goes in.
The expected, good, scrap and variance figures are always on screen. The operator is logged out after 90 seconds without a tap, so the next one can step up.
Downtime report
On Manufacturing → Work Orders, click Downtime. Pick a date range (From, To) and optionally a Work center, Reason or Status (Open or Closed). The report shows Total downtime, Events and Open now, breaks it down By reason and By work center, and lists each event with its duration, machine, work order, operator and reason. If a downtime was never ended on the floor, click End here.
Work orders for customer orders
Build-to-order products can get work orders from the customer's order. The product needs an inventory item with an active BOM.
Automatically. On the product's edit page, Work Order Creation decides what happens when an order is paid:
- Per Unit: one work order per unit ordered
- Single Batch: one work order for the whole quantity
- Manual Only: none; you create them yourself
- Use Store Default: the Default Work Order Mode on Settings → General
By hand. On the order's page, a build-to-order line without work orders has Create work orders. It uses the product's mode (Manual Only makes one per unit).
Either way the line's build stage moves to Processing, and the line shows its work order numbers. The work order page shows the Customer Order it's for. When every work order for the line is completed, its build stage moves to Packing, and the order is ready to pack and ship.
Stock when shipping
Completing a work order adds the product to stock. If the product doesn't track inventory, checkout didn't take it out of stock, so shipping the order takes the made quantity out then. Each work order is only counted once. If the product does track inventory, checkout already took it out and shipping changes nothing.
Cost and pricing
Roll up material, labour, machine, scrap and overhead costs for every manufactured product, and work out a sell price.
Cost centers
A cost center is one hourly rate for a kind of work, bundling wages, machine wear and shop overhead: "Assembly bench $45/hr", "CNC station $85/hr", "Paint booth $65/hr".
- Go to Manufacturing → Cost Centers and click + New Cost Center.
- Fill in:
- Name: what you'll see on the BOM operation form
- Code (optional): a short code for reports
- Type: Labour, Machine or Blended (Blended is the usual choice)
- Hourly rate: all-in cost per hour
- Description: how you worked out the rate
- Save.
Each BOM operation can have its own cost center, or uses the default from Costing Settings.
Costing settings
Open Settings → Costing (or Costing Settings on the Cost Centers page).
Defaults, used when a product doesn't override them:
- Default target margin (%): the gross margin for the suggested price.
price = cost ÷ (1 − margin/100). - Indirect overhead (%): admin and sales overhead on top of material and labour.
- Scrap / yield loss (%): extra to cover parts and labour lost to scrap.
- Default cost center: for BOM operations without one.
- Rounding strategy: none (2 decimal places), charm pricing (
.99), or the nearest whole unit.
Automation (off until you turn it on; check the numbers first):
- Recalculate product cost when a BOM is saved
- Recalculate affected products when a component's unit cost changes, for every product that uses it
- Take a nightly cost snapshot of every manufactured product, for trend charts even when nothing changed
- Snapshot retention (days): how long to keep cost history;
0keeps it forever
Recalculate all product costs rebuilds the cost of every manufactured product in the background and shows its progress.
A product's cost
On a manufactured product's edit page, click Cost & Pricing:
- Cost summary: per unit, material, labour, machine, scrap, overhead and total.
- Suggested sell price at the target margin, and how far it is from the current price.
- Every component and operation behind the cost, each one a link to where its number is set: a material or sub-assembly opens its inventory item (unit cost), an operation opens its cost center (hourly rate). Missing or zero-cost components are in red.
- Recalculate takes a fresh snapshot.
- Apply as product price copies the suggested price onto the product.
- History shows a chart of cost and suggested price over time and a table of every snapshot. Use it to spot costs creeping up before they eat your margin.