Order Management
Every sale (online, by phone or at the register) becomes an order. Orders live in Sales → Orders.
The Orders list
Sales → Orders lists your orders, newest first. Phone Order at the top starts an order you take over the phone.
On a phone order, search for the customer by name, email or phone: it finds anyone who has ordered from you. To charge a different price, type it in the line's Price box; the line shows the list price underneath. To take something off the whole order, enter it under Discount as $ off or % off; it adds to any discount code, and it can't be more than the subtotal. Prices you change and discounts you give are written in the order's staff notes with the list price, so you can see later why the order came to what it did.
Search and filters
- Search finds an order by its number, the customer's name or email, or what was ordered (a product name, part number or variant SKU).
- All Status: Pending, Processing, Partially Shipped, Completed, Cancelled, Failed or Refunded.
- All Steps: orders on one of your order steps.
- All Fulfillment: Needs Fulfillment, Processing, Shipped, Delivered, Local Pickup or Local Delivery.
Filters apply as soon as you change them (a search applies when you stop typing, or on a phone when you tap Search). Clear resets them.
Pending and cancelled orders are hidden until you pick that status: pending orders are mostly checkouts that were never paid. The Cancelled and Refunded views are sorted by when each order was last changed, so an order you just cancelled or refunded is at the top even if it was placed weeks ago.
The list shows each order's number, customer, items, total, Step, Fulfillment, notes and date.
Saved views: set the filters, open Saved views, name them and click Save. Pick the name later to get them back. Only you see your saved views.
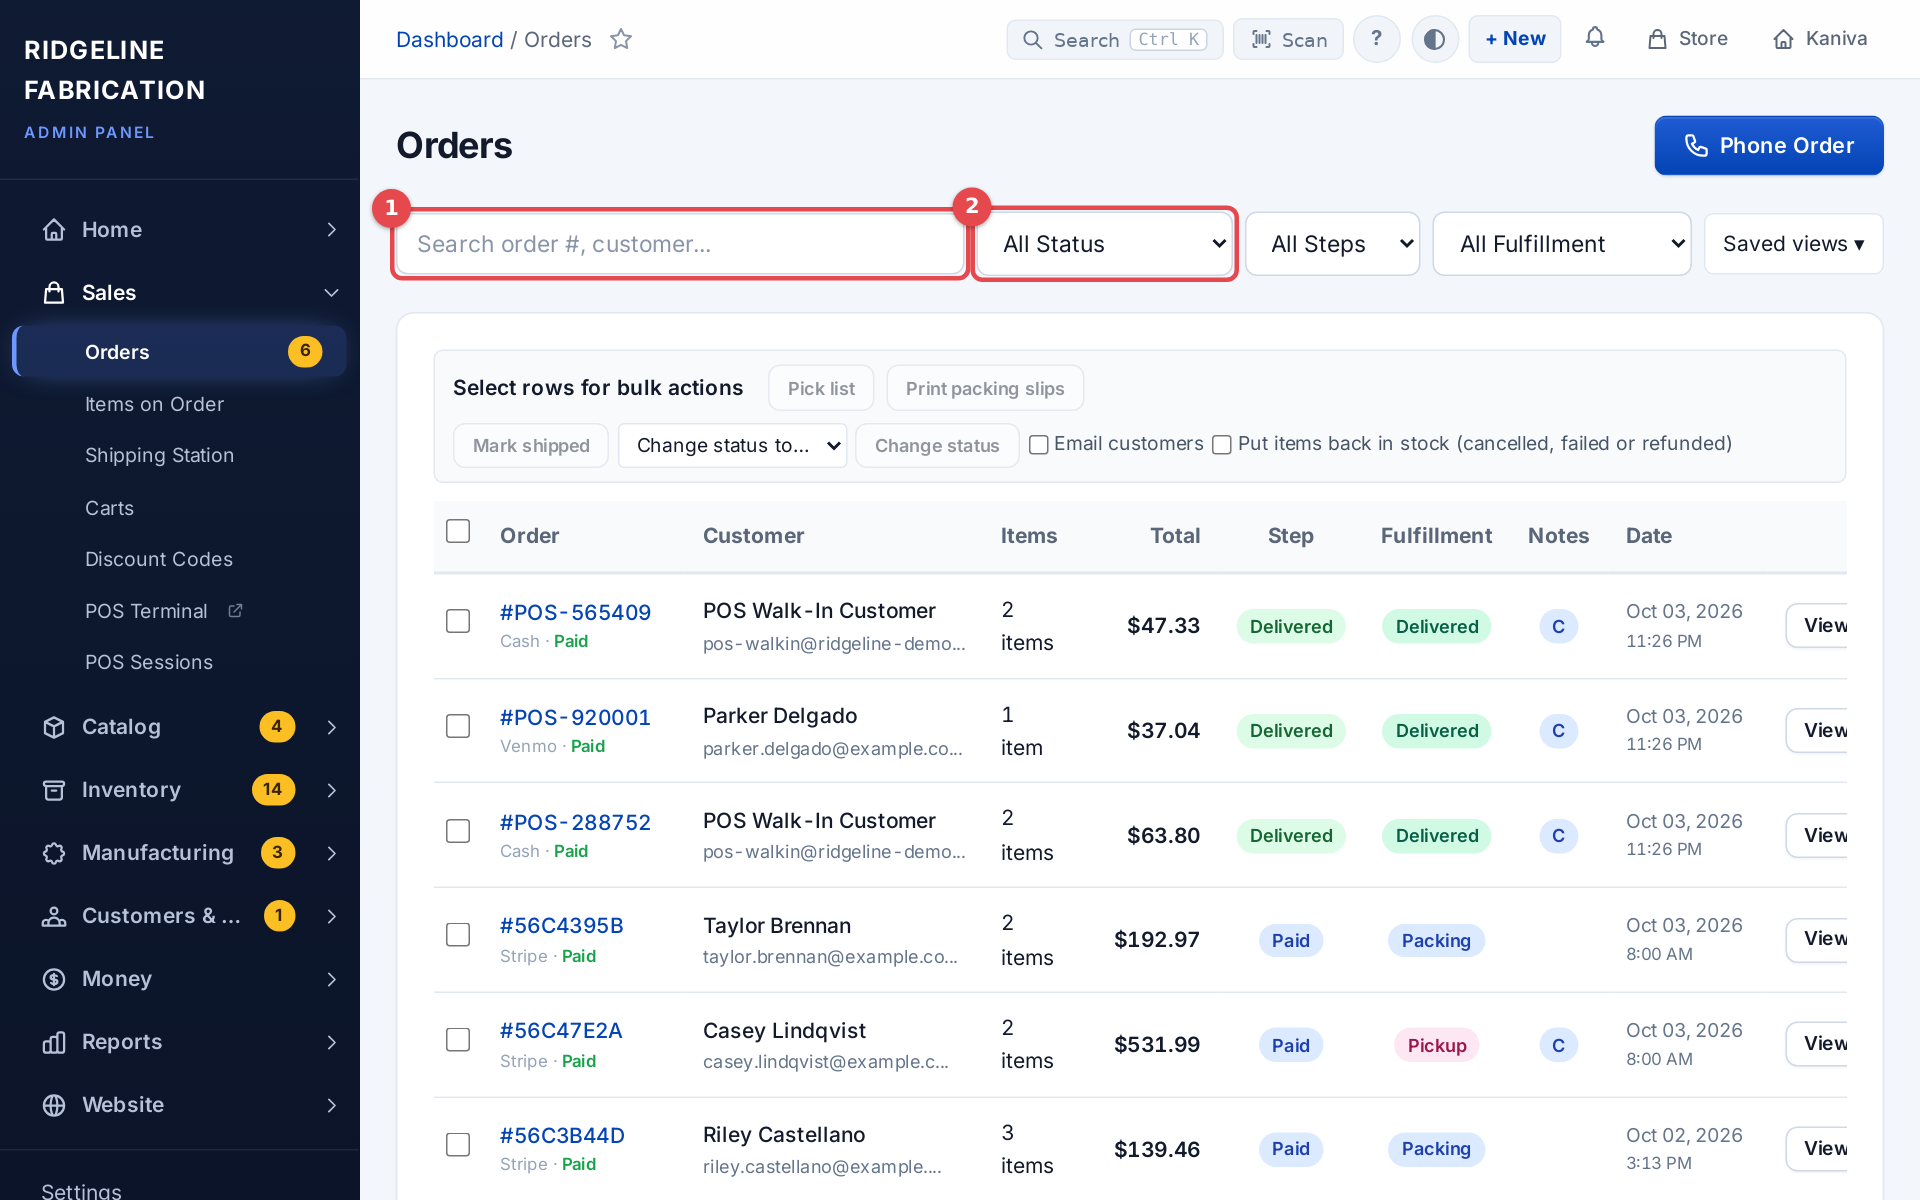 The Orders list with its filters
Bulk actions
Tick orders (or the header box for the whole page), then use the bar above the table:
- Pick list opens one pick list for all the selected orders, in walking order, with a tote letter per order.
- Print packing slips opens one printable slip per selected order in a new tab (ship-to, bill-to, items with SKU and quantity, customer notes). These are plain slips; the per-box slips with the peel-off label are on each order's packing page. With Advanced Inventory both kinds of slip show the Bin each line comes from.
- Mark shipped sets fulfillment to Shipped. Digital-only orders and orders already shipped or delivered are skipped.
- Change status to… → Change status sets the order status, with the same effects as Advanced: set order status on the order page (for example Cancelled or Refunded turns off download access).
- Tick Email customers to send each customer the usual status email. It is off by default.
- Tick Put items back in stock (cancelled, failed or refunded) to restock everything on those orders.
- Cancelled and Refunded skip paid orders, which the message counts: cancel or refund those one at a time so the money goes back.
You are asked to confirm with the number of orders, and the message afterwards says how many changed and how many were skipped.
Order statuses
The status is the order's payment and lifecycle state. Revenue, accounting and refunds read it. Day to day you move orders with the step bar, not by setting the status.
| Status | Meaning |
|---|---|
| Pending | Placed but not paid yet (the order page shows Awaiting payment). Mostly unfinished checkouts |
| Processing | Paid (or deposit paid) and being made, packed or shipped |
| Partially Shipped | Some items have shipped and others haven't (several boxes, or a dropshipped item) |
| Completed | Done |
| Cancelled | Cancelled before it was fulfilled |
| Failed | The payment failed |
| Refunded | Fully refunded |
Separately, each order has a fulfillment state (the Fulfillment column): Pending (Needs Fulfillment), Processing, Partially Shipped, Labeled, Shipped or Delivered, or Local Pickup / Local Delivery for orders that don't go by carrier.
Order Steps
Every order page has a step bar at the top: the steps the order goes through, with the current one highlighted, and one main button that moves it to the next step. You choose the steps at Settings → Order steps.
 The step bar and its main button
The default steps are Paid → Building → Packed → Shipped → Delivered.
- Paid is always first and Delivered always last.
- Building only shows on orders with build-to-order items.
- Digital-only orders go straight from Paid to Delivered.
Orders move along on their own:
- to Paid when the payment arrives
- to Building when a build stage starts
- to Packed when every item is in a box
- to Shipped when you buy a label (or add tracking by hand)
- to Delivered when the carrier reports delivery
The main button. Steps you add yourself are moved by hand: the main button reads Mark and the next step's name (for example Mark Powder coat). When the next step is Shipped, the main button is Ship, which takes you to the shipping card further down, and Mark Shipped beside it marks the order shipped without a label. An unpaid order shows Waiting for payment instead of a button. A cancelled, refunded or failed order shows its status, and the steps are greyed out.
Going back or skipping. More → Move to step puts an order on any step, forward or back. Every move is recorded in the order's activity log.
Setting up your steps
On Settings → Order steps, under Order timeline:
- + Add a step adds your own step between Paid and Delivered, such as "Powder coat" or "QC". Rename any step, and reorder steps with the arrows.
- Each step shows how it moves: Set when paid, Set when a build starts, Set when fully packed, Set when a label is bought, Completes the order, or Moved by hand for your own steps.
- Show to customers: the step appears on the customer's order page and the tracking page.
- Email customer: the customer gets an email when the order reaches the step. Shipped emails by default, with the tracking details.
- Pickup orders: Shipped and Delivered have a second name for local-pickup orders. The defaults are "Ready for pickup" and "Picked up". Local-delivery orders show Shipped as "Out for delivery".
Click Save order steps.
When an action has a notify box (buying a label, Update fulfillment), unticking it sends nothing. When a step sends its email, the old status email isn't sent as well.
Under Emails and completing orders on the same page:
- Send me a copy of every step email a customer gets (on by default): a hidden copy of each step email goes to the admin email in Settings (or the support email if that's empty). Separate several addresses with commas.
- Complete shipped orders: As soon as every box has shipped (the default) moves an order to the last step when its last label is bought; the customer still gets the Shipped email, and tracking still records the delivery date. When the carrier says it's delivered leaves it on Shipped until tracking shows it delivered, then moves it on. Local-pickup orders and partly shipped orders aren't moved early.
Build stages are the progress of each build-to-order item, on the same page. Rename, add (+ Add a stage) and reorder them. Order received, Processing, Packing and Shipped can be renamed but stay in place, because work orders and packing move items to them.
Removing a step. A step or stage that open orders or items are on shows how many are there, and can't be removed until you move them.
Returns, on the same page: the Restocking fee, whether to Refund the original shipping on returns and whether to Take the return label cost off the refund (see Take a return).
Cancelling paid orders, on the same page: cancelling a paid order refunds it. Tick who may also choose Cancel without refunding, for money already paid back another way (cash handed back, a refund made outside Kaniva). The owner always can; Admins are ticked to start with, Staff aren't.
Orders placed before steps existed are shown on the timeline based on their status and shipping. Nothing about them changes until you move them.
The order page
Click an order on the list to open it. The main column has:
- Order Items: each line with its price. Build-to-order lines show their lead time, time elapsed and build stage, and Create work orders (or links to them once they exist). Lines with customer files show Customer Customization Files and the customer's notes. A tracked-stock line shows Oversold · short N when more were sold than you had; the order's own units come off stock when it's placed, so an order that bought your last one shows no warning.
- Deposit Order (deposit orders only): see Deposits & Partial Payments.
- Shipping & Fulfillment: the address, shipping method, tracking and boxes. See Shipping.
- Customer Notes: what the customer wrote at checkout.
- Digital Downloads (orders with downloads).
- Staff Notes: internal notes the customer never sees. Type and click Save Notes.
- Activity: the order's history (see Activity log).
The side column has Customer (the billing name and email: the person paying), Account (the login that placed the order, or Guest checkout), Order Details (date, payment method and status, payment ID, discount code) and Billing Address. The two cards differ when staff place a phone order or someone buys for another person.
Processing an order
- Open the order from Sales → Orders.
- Check the items, the shipping address and the payment.
- For build-to-order items, create the work orders and move the build along. See Build to order.
- Use the main button in the step bar to move the order through your steps.
- Pack and ship it: Ship in the step bar or the Shipping & Fulfillment card. See Pick, pack and ship.
- The order moves to Shipped when the label is bought, and to Delivered when the carrier reports delivery.
Shipping from the order page
The Shipping & Fulfillment card holds the shipping actions:
- Nothing packed yet: one Ship button opens quick ship, which asks for the box size and weight and then buys the label for the whole order.
- Packed boxes: each box without a label has its own Ship button, which opens the Shipping Station with that box's barcode already scanned. Boxes that already have a label show Label instead. Pick list and the packing station are linked from the Shipment Boxes list.
- Ship buttons show for orders with physical items that are not shipped, cancelled or local pickup.
- Tracking for each box: once a box has a label, it shows where it is: Label created → In transit → Out for delivery → Delivered, the carrier's latest message, the expected delivery date and when tracking last checked. A delivery problem or a return to sender shows in red. Scan history lists every scan with its date, time and place. Tracking is checked every 2 hours, and straight away when the carrier sends an update through your Shippo webhook (Settings → Shipping).
- Shipped another way? Add tracking by hand opens Update fulfillment: pick the Status, Carrier and Tracking Number for a parcel you sent outside Kaniva.
The More menu
More at the top right of the order page holds everything else. It only shows the actions the order allows:
- Move to step: put the order on any step, with a link to Edit your steps.
- Resend confirmation: email the order confirmation again (paid orders).
- Edit order…: change quantities, remove or add items, change a price, the shipping charge or the shipping address (see Editing an order).
- Start a return…: for a shipped order, when the customer is sending items back (see Take a return).
- Issue refund…: opens the refund form, where you pick the items, shipping or other amount to refund (any paid order until it's fully refunded, shipped ones included).
- Cancel order…: opens the cancel form for a pending or processing order. A paid order is refunded as it's cancelled. An order with an item already sent to a dropship supplier can't be cancelled; refund it instead.
- Put items back in stock…: for orders that can no longer be cancelled, such as one refunded in Stripe or PayPal, or a return.
The Cancel or refund an order guide walks through all three.
Advanced: set order status at the bottom of the side column sets the status by hand, for fixing an order. It has Email customer about this change and, when there is stock to return, Put the items back in stock (when cancelling, failing or refunding). Click Update Status. Day to day, use the step bar. It won't set Cancelled or Refunded on an order with money still paid, since that would skip the refund: use Cancel order… or Issue refund….
Editing an order
More → Edit order… changes a pending or processing order that hasn't shipped and has no refund on it.
- Items: change the Quantity (0 removes the item) or Price each. A new price asks Why the price changed, which goes in the order's history.
- Add an item: search by name or SKU and pick the product, or one of its variants. Kaniva won't add more than is in stock.
- Shipping: the Shipping charge, and the shipping address (not once a label is bought: void it first).
- An item that's been picked, packed, sent to a supplier, started as a work order or had its royalty paid shows why, and can't change.
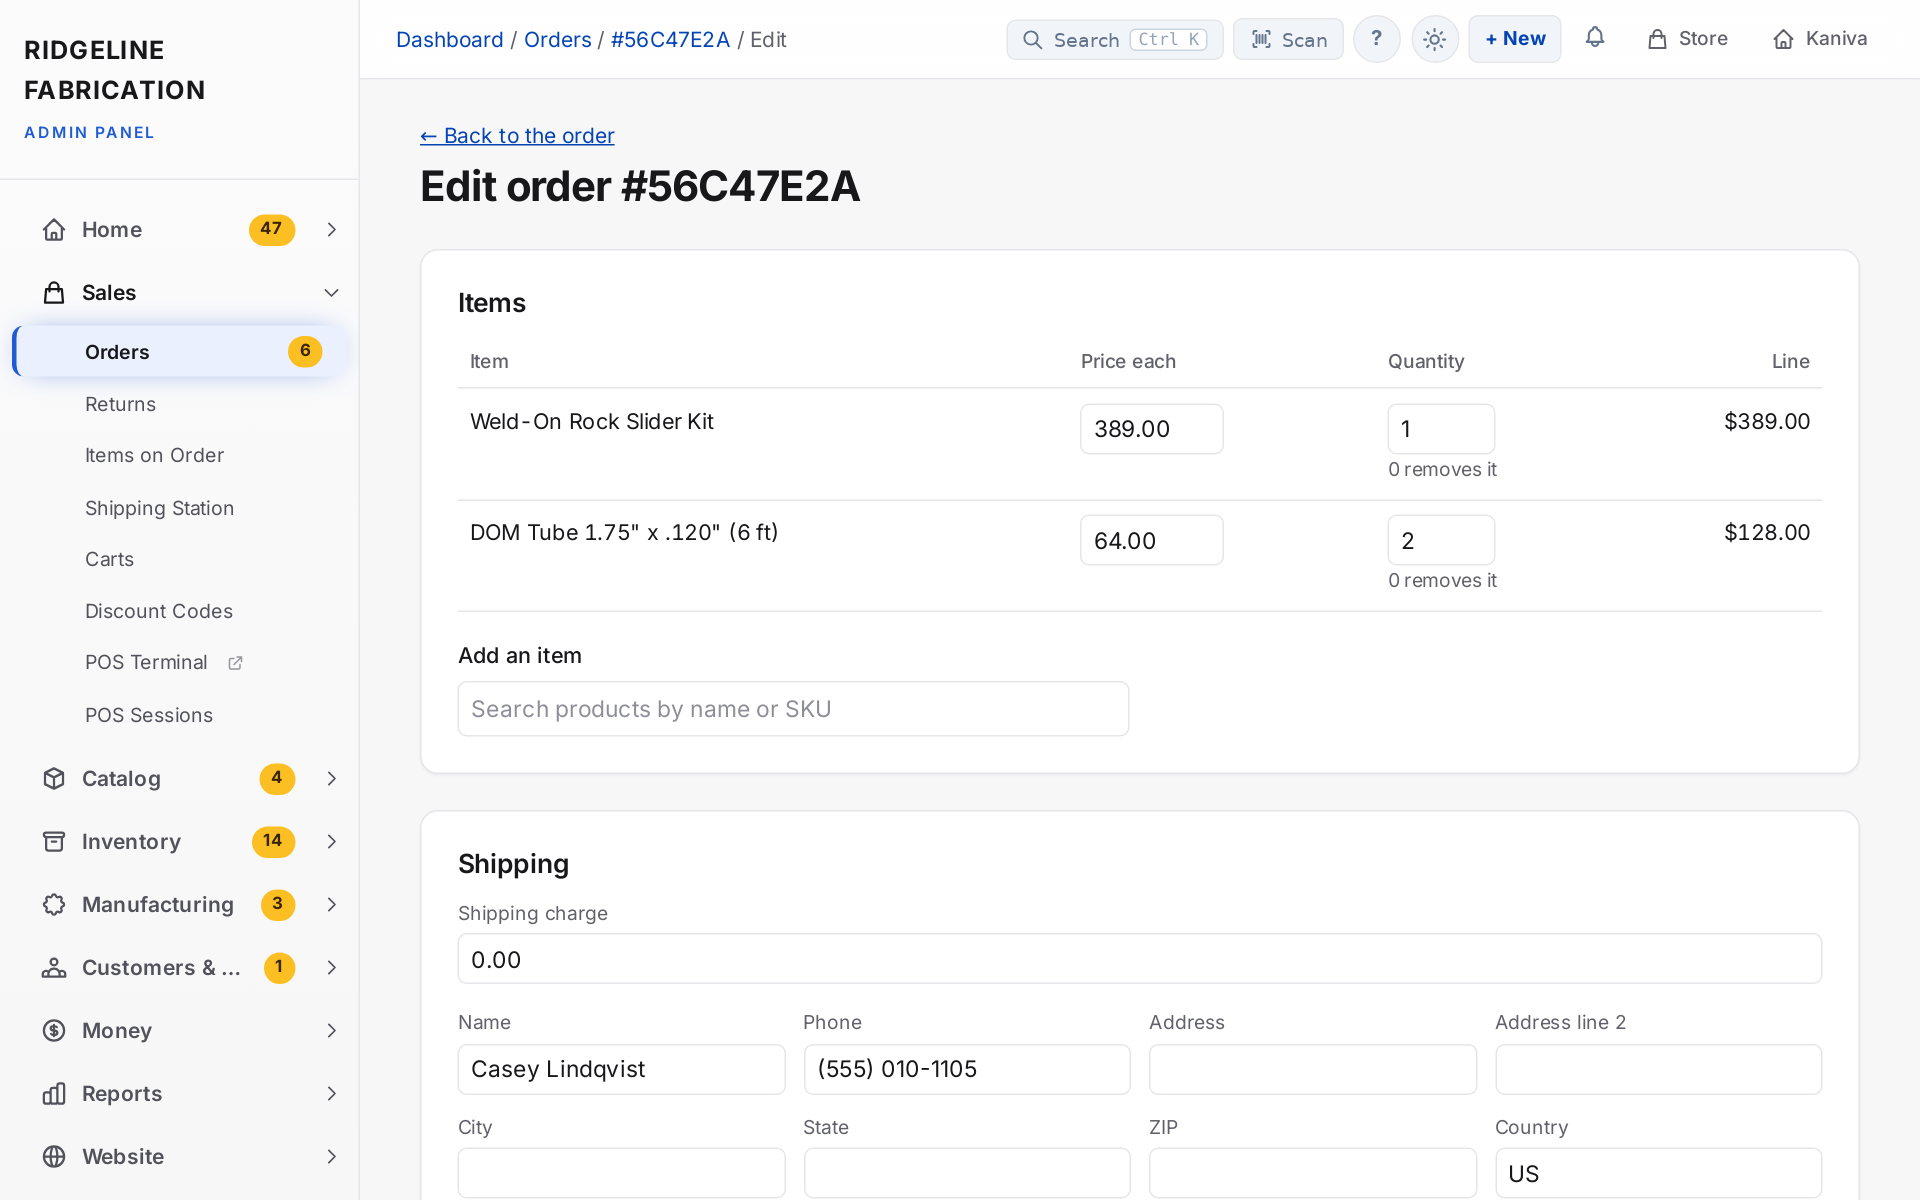 Editing an order
Click Review changes. Kaniva works out the tax again for the new items and address and shows the totals now and after, and what happens to the money:
- Less than was paid: the difference goes back through Stripe or PayPal (a cash order: you pay it back by hand).
- More than was paid: the customer owes the rest. The order shows Balance due after an edit with the balance link and Email Balance Request, and the customer's email has a button to pay.
Click Save changes. Removed items go back in stock, added ones are held for the order, and the customer gets an email with the updated order unless you untick Email the customer the updated order. The change is listed in the Refund Information card. Accounting and the sales tax reports keep the original sale on the order's day and count the change on the day you made it.
Changed something after reviewing? Save changes hides until you click Review changes again, so what's saved is what you saw.
Putting items back in stock
Cancelling, refunding and Put items back in stock… all return stock the same way:
- A variant gets its own stock back, otherwise the product does. With Advanced Inventory, items not packed yet were never taken off the shelf: their hold is let go and no bin changes. Items already packed go into the item's home bin.
- Only items that track stock are listed. Each line shows how many can still go back ("of 2").
- Kaniva remembers what has gone back, so an item is never restocked more times than it was sold.
- Leave a line at 0 for anything not coming back (damaged, or kept by the customer).
A shopper who cancels a PayPal or Venmo checkout, or abandons one and starts again, gets the stock put back automatically. With Advanced Inventory, cancelling, failing or refunding an order that hasn't been packed always lets go of its held stock, ticked or not, because it never left the shelf.
Editing order addresses
If a shipping or billing address is missing or wrong, fix it on the order page:
- Click Edit next to Ship To (in the Shipping & Fulfillment card) or next to Billing Address (in the side column).
- Change the fields.
- Click Save.
Orders with no address show "No shipping address on file" or "No billing address on file" in red.
Items on Order (Prep List)
Open Sales → Items on Order for an aggregated view of everything you still need to get ready. Instead of listing orders, this page combines the line items from every order that is still being fulfilled (processing or partially shipped) into one row per product/variant.
Each row shows:
- Qty Needed — total units required across all open orders
- On Hand — current stock (variant stock for variant items, otherwise product stock; shows "—" if inventory isn't tracked)
- Short — how many more you need than you have in stock, or "In stock"
- In Orders — how many orders include the item, with a link to each one (and the quantity per order)
- Build stages — for build-to-order items, a breakdown of how many units are at each stage (e.g. "Welding: 3, QC: 2")
The summary tiles at the top show the number of distinct items, total units, and open-order count. Abandoned checkouts, completed/shipped, cancelled, failed, and refunded orders are excluded, since none of those need anything prepared.
Picking in walking order
A pick list tells you where to go for every item on one or more orders, in the order you walk the shop. Open it from an order's Shipment Boxes card (Pick list), or tick several orders on the Orders list and use Pick list in the bar above the table. Only orders that are processing or partially shipped are picked; items already shipped, digital items and items your supplier ships for you are left out.
Where each item comes from (Advanced Inventory):
- If the item's home bin holds enough, you take it all from there.
- Otherwise Kaniva takes it from the places holding the item, in walking order, until there's enough.
- A stop is wherever the stock is: a shelf spot (
A-03-2), a bin on a shelf (LOC-000231 on A-03-2) or a cart in a parking spot (Cart 1 at Cart parking 2). Bins and carts take the place in the walk of what they sit on. Places that aren't in your shop layout come after, by name. - Also at under a stop lists up to three other places that hold the same item, with how many are there.
- Anything no shelf has enough of is listed at the end under Not on a shelf, as is anything that isn't in inventory.
- The walk ends at your packing spot (the bench or floor area marked as packing in the shop layout).
Several orders at once: each order gets a tote letter (A, B, C… in the order the walk first reaches it). When two orders need the same item from the same place it's one stop, with how many go into each tote.
The printed list has a box to tick per stop, the stop's code in large type with where it sits, the item and its part number, and the quantity (per tote for several orders). A divider marks each floor (for example Upstairs), and the last line is Take to packing. With Advanced Inventory it has Pick on phone and a QR code that opens the same list on a phone.
Picking on a phone shows one stop at a time: the code in large type, where it sits, a small plan of the floor with the rack lit up, the item with its picture, and the quantity (per tote).
- Scan the stop's bin or shelf label first. Picked stays greyed out until you do, a different label is refused, and scanning the part before the label asks for the label. If the label is damaged or missing, tap Label missing? to confirm the spot by hand; the end screen lists those stops. Several items in a row at the same spot need only one label scan. An owner or admin can turn this off at Inventory → Shop layout → Picking (Scan the bin or shelf label first); then the label scan is optional and the part alone will do.
- Scan the part, or tap Picked. Use + and − if there are fewer than needed.
- If you picked fewer than needed and the item is somewhere else too, Kaniva offers to get the rest from there: on the way, it becomes the next stop in walking order; behind you, it goes to the end. Or tap Leave it short.
- Skip moves a stop to the end; Back goes back one.
- At the end it says to take the totes to packing, and lists anything skipped, picked short or not on a shelf.
Keyboard-wedge scanners and the Camera button both work. Your place is kept in that browser tab, so a reload carries on where you were. Each stop you pick marks the order's line as picked and moves the units from the bin to Packing, still held for the order. Packing the order takes them from there.
Tote cards keep each order together when you pick several at once. Turn them on at Inventory → Shop layout → Picking (owners and admins). The pick list then has a Tote cards button:
- Print the cards, on 4 × 6 labels or letter paper (four to a page, cut on the dashed lines). Each card has the tote letter in large type, the order number, the customer, how many items, and a barcode.
- Put one card in each tote before you walk. The pick list and the phone tell you which tote each item goes in.
- At packing, scan the card with the Scan box or any scanner on an admin page. That order opens in the packing station.
Without Advanced Inventory the pick list is the items on the orders by name, with no bins, and picking on a phone isn't available.
Variants that track stock are picked from their own bins.
Deposits & Partial Payments
Customers can pay a deposit at checkout and the balance later: useful for build-to-order and custom work you want to start after a partial payment.
Setting it up:
- In Settings → Payments, tick Enable deposits store-wide and, if you like, set a Default deposit %. See Payment Settings.
- On each product you want to offer a deposit for, tick Allow deposit (pay part now, balance later) on its Inventory tab (build-to-order products, or physical products that sell as build-to-order when out of stock). You can set a per-product Deposit percentage, or leave it blank to use the store default.
A product only offers a deposit when both the store switch and the product's box are on.
What the customer sees:
When a cart holds at least one deposit product, the checkout summary offers Pay in full now or Pay a deposit of $X now, with the amount due now and the balance due later. Deposits work with both Stripe and PayPal/Venmo.
Each deposit product is split by its own deposit percentage (a cart with a 50% item and a 25% item collects the right amount for each). Other products and any discount are always paid up front.
How shipping and tax are handled is your choice: Deposit applies to in Settings → Payments:
| Setting | Pay now | Pay later (balance) |
|---|---|---|
| Entire order (default) | Deposit % of the product and the same share of shipping and tax | The rest |
| Product price only | Deposit % of the product only | The rest of the product and all shipping and tax |
| Product deposit + full shipping & tax charged up front | Deposit % of the product and all shipping and tax | The rest of the product only |
"Product price only" is the usual build-to-order choice: a small deposit starts the build, and shipping is collected when it ships.
The order:
- A deposit order moves to Processing so you can start work. The order total stays the full amount; the balance is tracked separately.
- Digital downloads are not released until the balance is paid.
- Each payment (the deposit, then the balance) is listed in the order's activity.
Collecting the balance:
Open the order and find the Deposit Order card. It shows Paid, Balance Due and a private Balance payment link. You can:
- copy the link and send it however you like,
- click Email Balance Request to send the customer an email with a Pay Remaining Balance button, or
- under Record a payment (in person), record cash, a check, ACH / bank or another payment with an optional reference, and click Record Payment.
The customer pays the balance online (Stripe or PayPal) from the link. The order confirmation email also has the link, so they can pay any time. Once the balance is paid, the card shows ✓ Fully paid.
Refunds: a refund on a deposit order is capped at what has actually been collected.
Order Activity Log
Every order page has an Activity card: a log of everything that happened to the order, in time order.
- When the order was placed, and by whom
- Every payment: deposit, balance, or a payment recorded by hand (amount, method, reference)
- Status changes, step moves, cancellations, refunds and items put back in stock
- Tracking and fulfillment updates
- Emails sent to the customer (confirmation, status update, balance request, refund and so on), with the recipient
Use it to answer "what happened with this order, and when?" in one place. Very old orders may show less, because tracking and email events were added to the log later.