Product Management
Everything you sell is a product: a part you stock, a download, a made-to-order build, or a bundle. Products live in Catalog → Products.
The Products list
Catalog → Products lists your products. The buttons at the top are Saved views, Export (all products to a CSV file), Import (see Import from Shopify) and Add Product. There is no limit on how many products a store can list.
Search and filters
| Filter | Options |
|---|---|
| Search | Name, SKU/part number or slug |
| Category | All Categories, or one category |
| Status | Active Only (the default), All Products, or Inactive Only with how many there are |
| Type | All Types, Digital, Physical or Build to Order |
Click Search to apply them and Clear to reset. Because the list shows active products only by default, a line under the filters tells you how many inactive products are hidden, with links to View inactive or show all.
The list shows each product's Thumbnail, name, SKU, Type, Category, Price, Stock and Status. Stock is the on-hand count; for a product with variants it is the total, as "n in m variants". It reads Not tracked when the product doesn't track inventory, Made to order for build-to-order products and a dash for digital products. Stock at zero or below is red, and 5 or fewer is amber.
Click a row (or Edit) to open the product. Delete removes it after you confirm.
Saved views
Set the filters you use often, open Saved views, type a name and click Save. Pick the name from the same menu later to get those filters back. Saving with an existing name replaces that view, and × deletes one. Saved views are yours alone: other staff don't see them. Orders and Inventory Items have the same menu.
Bulk actions
Tick the box at the start of each row, or the box in the header to select every product on the page. The bar above the table then offers:
- Activate / Deactivate the selected products.
- Set category… → Apply: puts the selected products in that one category (their other categories are removed).
- Library add-on… → Add or Remove: offers a library add-on on the selected products, or takes it off (see Add-ons).
- Delete: products that already have orders are deactivated instead, so order history keeps working.
- Print product labels: opens the label page for the selected products (see Printing Product Labels).
Each action asks you to confirm and says how many products it will change.
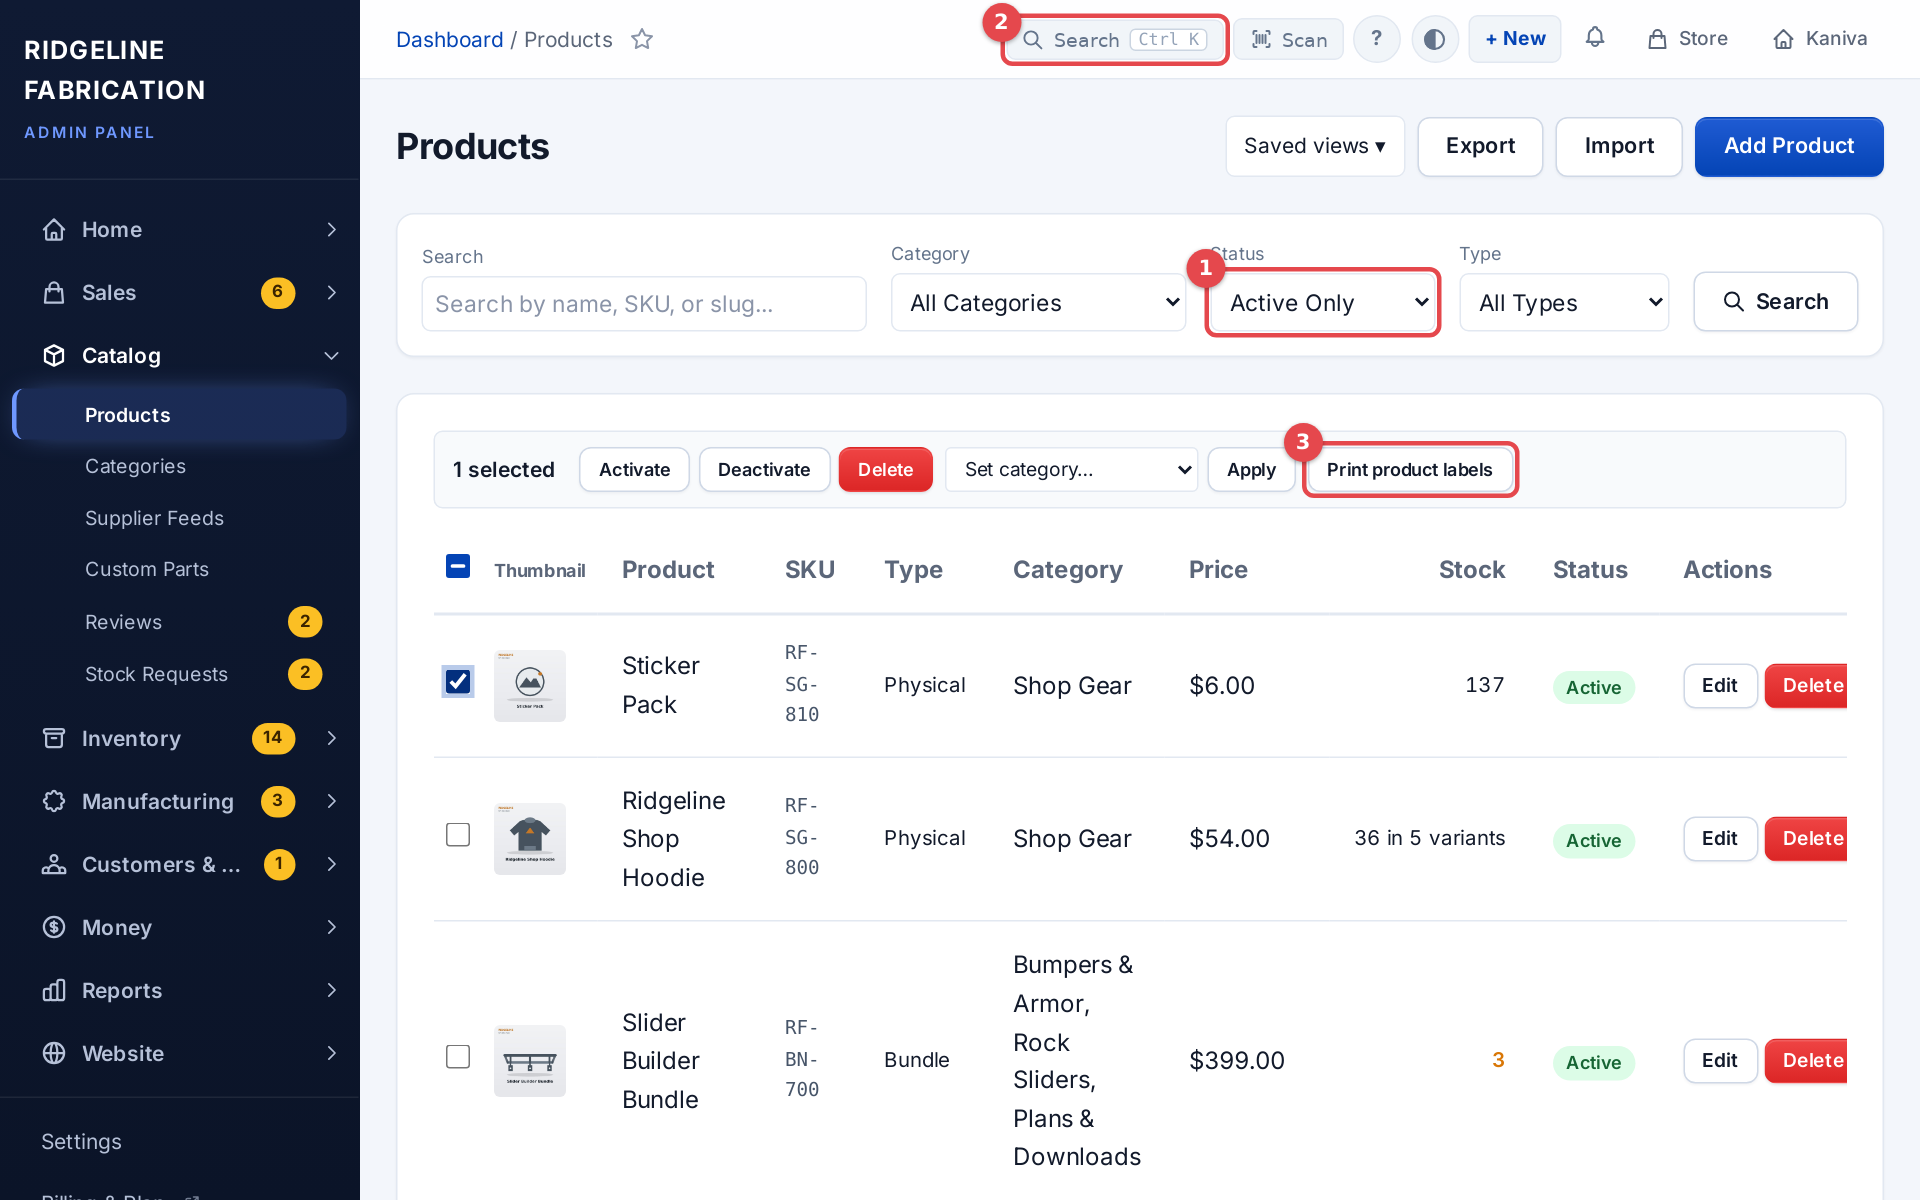 The Products list with its filters and bulk bar
Adding a product
- Open Catalog → Products and click Add Product.
- Choose the Product Type first: it decides which fields you see (see below).
- Fill in at least Name and Price. Everything else can wait.
- Click Create Product. The product opens in the edit page, where you can add variants, gallery photos and files.
The form is split into tabs: Basics, Pricing & Cost, Inventory, Shipping, Media and Visibility. If a save fails, the form opens on the tab with the problem, which is marked with a red dot. Ctrl+S / ⌘S saves from any tab. On the edit page, Save at the top right saves too. Save takes you back to the product list you came from. Save and keep editing saves and stays on the same product and tab, which helps when you're fixing one detail, such as adding a weight before listing on eBay. ← Products above the title (and your browser's back button after Save and keep editing) takes you back to the product list with your search and filters as you left them.
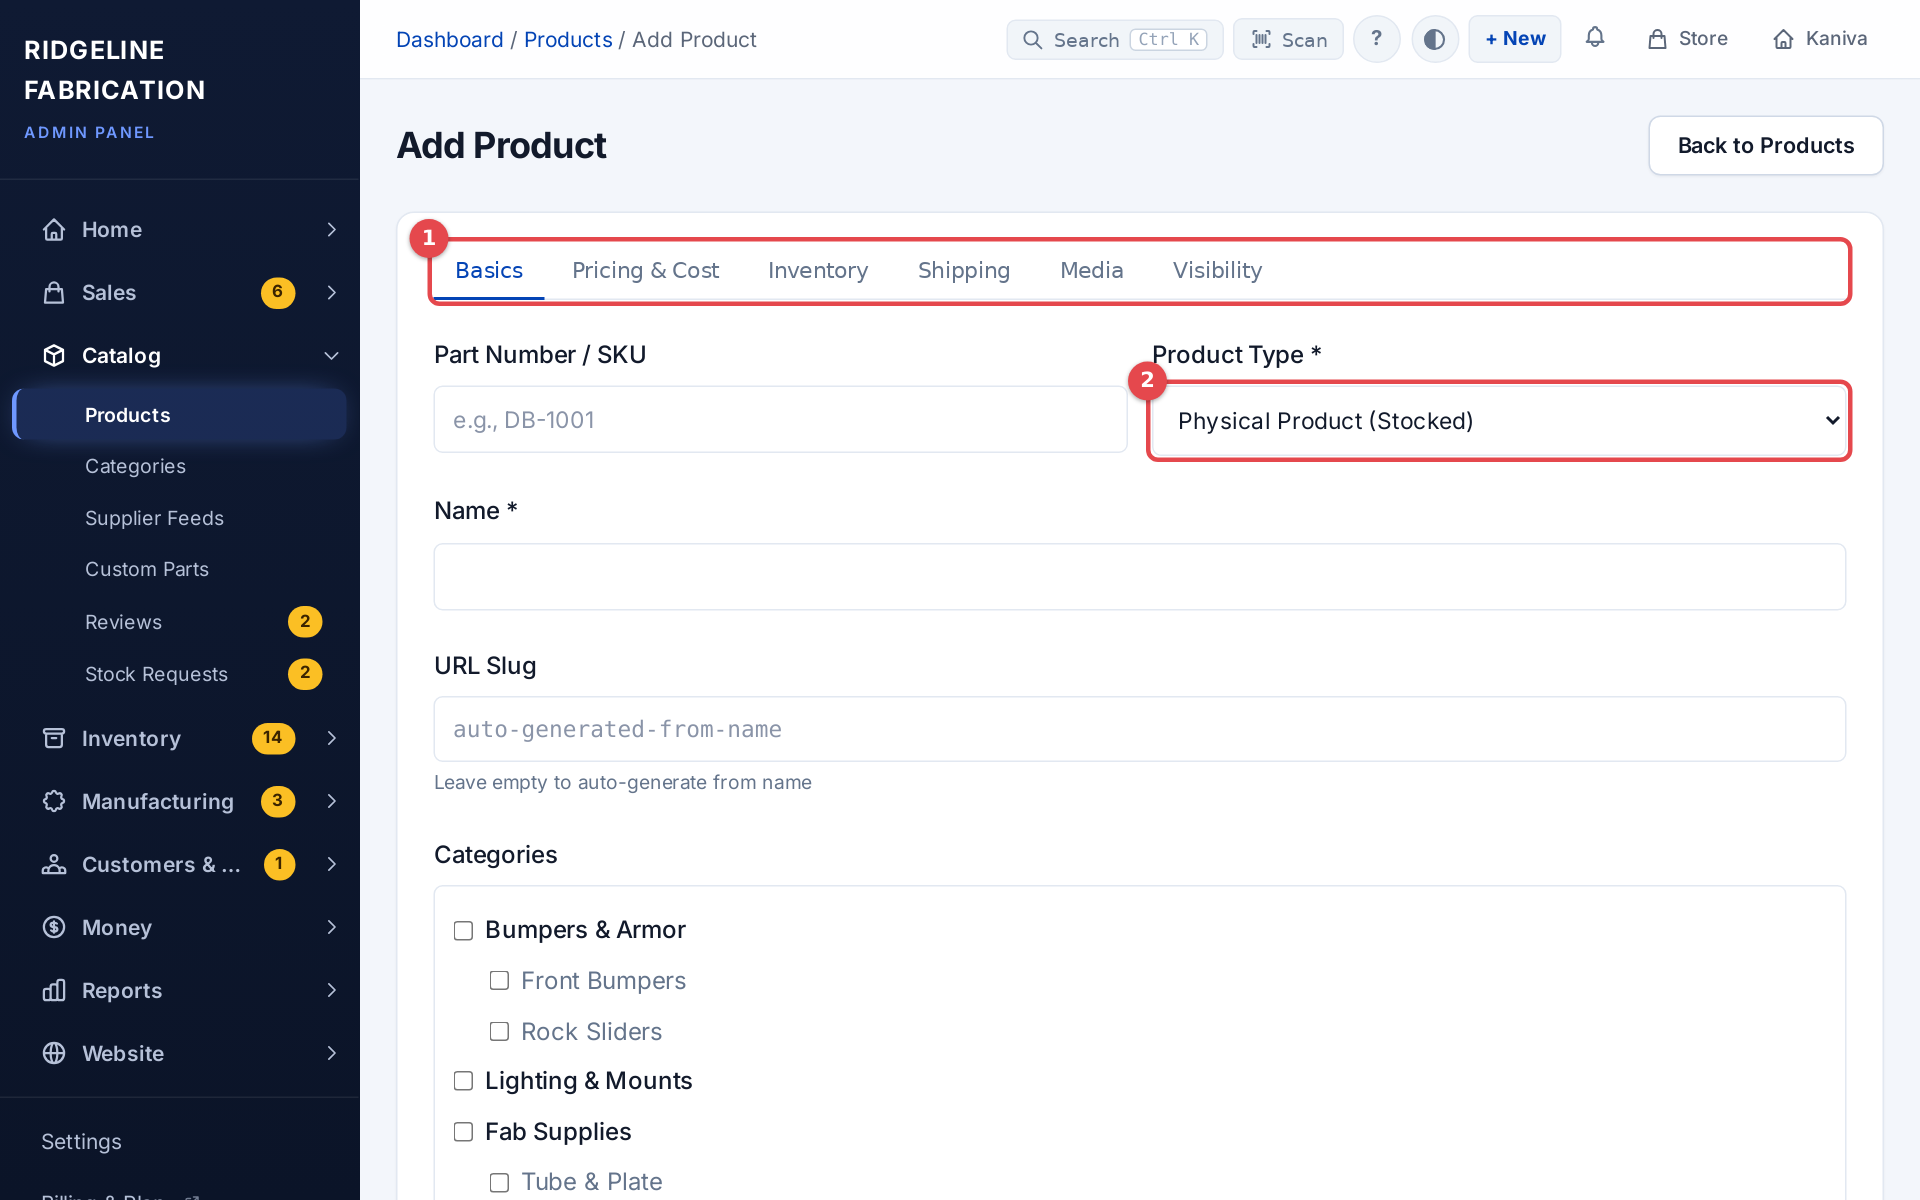 The product form's tabs and the Product Type dropdown
Product types
The Product Type dropdown on the Basics tab:
| Type | Use it for | What changes on the form |
|---|---|---|
| Digital Download | Files customers download after paying | License Type and License Notes appear; stock and shipping fields are hidden; Downloadable Files appears |
| Physical Product (Stocked) | Things you have on the shelf and ship | Stock, shipping and, optionally, When out of stock, sell as Build-to-Order |
| Build to Order (Custom) | Things you make after the order comes in | The build-to-order section on the Inventory tab; Customer Customization Files on Basics |
| Bundle (Digital + Physical) | A physical item that also comes with a download | Both: stock and shipping, plus the licence fields and Downloadable Files |
Changing the type shows or hides the sections straight away, before you save.
Basics tab
- Part Number / SKU: your part number. It is also the barcode on product labels and what the register looks up. A new product offers the next number in your sequence (Use it fills it in), and as you type, the form says if a product, variant or inventory item already uses that number. Duplicates are still allowed.
- Name (required) and URL Slug (made from the name if you leave it blank).
- Categories: tick every category the product belongs in.
- Builder: the builder or dealer who designed it, if you use the Builder Program.
- Unit: Each, Pair, Set, Pack, Kit, Per Foot, Per Inch or Per Pound.
- Short Description (for listings) and Full Description (Rich Text).
- Search Engine Optimization (SEO): SEO Title, Meta Description and Meta Keywords (edit page only).
- Identifiers: UPC, brand, MPN, ASIN and condition (see Product Identifiers).
- Customer Customization Files: see below.
Write with AI
On a product's edit page, the Write with AI card at the top of the right-hand column drafts the listing for you from the product's photos (the main photo and up to four gallery photos) and what you've already filled in: name, part number, brand, MPN, categories, options, price, the current description and the vehicle fitment.
- Add the photos first. The more the photos show, the better the draft.
- Optionally type a Note for the AI ("mention it's powder coated", "keep it short").
- Click Draft listing. It takes a few seconds.
- The draft shows each field: Name, Short description, Full description, SEO title, Meta description and Meta keywords. Click Use next to the ones you want, or Use all. They fill the form; nothing changes until you click Save.
- Alt text for each gallery photo appears under Photo alt text. Edit it if you like and click Save alt text (it saves straight away). Your storefront shows it on the photo thumbnails, which helps search engines and shoppers using screen readers.
The AI only describes what the photos and your fields show. It won't make up measurements, materials or what the part fits; vehicles come only from the product's fitment. If something a buyer would want is missing, it says so in a note under the draft. Read the draft before you save it.
Drafts each month. Every plan includes free drafts: Pay As You Go 25, Solo 100, Shop 200, Enterprise unlimited (a free trial gets Shop's 200). The card shows how many you've used. When they run out, Draft listing waits until next month, unless the store owner turns on extra drafts on the Billing page ($0.10 each). A draft that fails or that the AI declines doesn't count.
The card appears once Kaniva has switched the helper on for your store.
Pricing & Cost tab
- Price (required): the regular selling price.
- Compare At Price: the original price, for sale items. When it is higher than Price, the storefront shows it struck through with a discount badge.
- Unit Cost: what one unit costs you. The margin, (price − cost) ÷ price, updates as you type. It is the same Unit Cost shown on Inventory Items, so a change in either place shows in both. Needs Advanced Inventory. Digital products have none.
- Pricing: Fixed price, Fixed price, offers welcome (see Offers), or Pay what you want (see below).
- Discount codes apply to this product: on by default. Untick it to leave this product out of every discount code; a code still works on the rest of the cart.
- Group Pricing: one row per customer group, with the group's Default Discount. Leave a row on Use default, or give that group a Fixed Price ($) or Or Discount (%) for this product. Tick Exclude from dealer pricing to make everyone, customer groups and builders alike, pay full price for it. See Customers.
With Manufacturing on, Cost & Pricing at the top of the edit page opens a full cost breakdown.
Pay what you want
Let customers choose the price, for downloads, patterns, art or anything you'd rather leave to them.
- Open the product and go to the Pricing & Cost tab.
- Set Pricing to Pay what you want.
- Price is now the suggested price: the amount the price box starts at, and what feeds and eBay show.
- Set Minimum price. 0 lets customers have it free.
- Click Save.
What customers see:
- Under the price, Pay what you want · minimum $10 (or from free), on the product page and in your catalogue.
- A Name your price box, filled in with the suggested price, with a few quick amounts to tap. A price under the minimum can't be added to the cart.
- In the cart, Your price can be changed (not below the minimum).
- A free download checks out with There's nothing to pay for this order, with no card needed.
Things to know:
- Choosing Pay what you want unticks Discount codes apply to this product. Tick it again if you want codes to work on it; a code never takes the price below your minimum.
- If you raise the minimum, a customer whose cart is under it is asked to change their price before they can pay.
- With dealer pricing on for the product, dealers' and builders' minimum and suggested price drop by their discount.
- The order shows each such line as Customer's price (suggested $20.00).
- Point of Sale sells the product at its suggested price.
Inventory tab
- Stock Quantity and Track Inventory. With Advanced Inventory the product's stock is kept in bins, so the form shows the number with Change stock bin by bin → instead of a box. Typing a total there would change no bin, and the bins and the total would drift apart.
- Min Order Qty: the smallest quantity a customer can order.
- Qty Increment: customers must order in multiples of this number.
- Supplier and Home bin (Advanced Inventory): the product's main supplier and the bin it belongs in. Dropshipped by this supplier emails the item to the supplier with a packing slip when an order is paid, and they add the tracking; see Shipping.
- When out of stock, sell as Build-to-Order (physical products): when stock runs out, the product keeps selling as a build-to-order item and the build-to-order section appears.
- Product Variants: see Variants.
Digital products have no stock, and the tab says so.
Build-to-order products
For Build to Order (Custom) products (and physical products with the out-of-stock fallback ticked), the Inventory tab has:
- Lead Time (required): shown to customers on the product page and at checkout.
- Product Page Title (optional) and Product Page Description (optional): the build-to-order notice on the product page. Blank uses your store's default.
- Custom Terms (optional): extra terms for this product. The default terms about orders being non-cancellable always apply.
- Allow deposit (pay part now, balance later) and Deposit percentage: see Deposits & Partial Payments. It needs deposits switched on in Settings → Payments.
- Work Order Creation: Use Store Default, Per Unit (one work order per unit), Single Batch (one for the whole quantity) or Manual Only. Automatic work orders need a Bill of Materials linked to the product's inventory item; see Manufacturing.
- Build Queue Capacity (Optional): Max Concurrent Builds caps how many of this product can be in the build queue. When Queue Is Full either Block new orders or Allow with warning, and Custom Queue Full Message (optional) is what the product page says. The edit page shows the current queue, and the dashboard shows every product's.
Variants
For products that come in options (size, color, side). Variants are added on the edit page, so create the product first.
- On the Inventory tab, tick Enable Variants.
- Click + Add Option and name it (for example Size), then add its values (S, M, L). Add a second option the same way if you need one (for example Color). Click a value's pencil to give it a display name or a color swatch.
- Click Generate Variant Combinations. A row appears for every combination.
- Fill in each row: SKU, UPC / EAN, MPN, ASIN, Price and Stock. Tick Track to count its stock and Active to sell it. × removes a row.
- Click Save Variants.
If you add values later, Show missing combinations lists the combinations that have no row yet.
Each variant has its own price. If you later change the product's price, every variant's price moves by the same amount (an XL that was $15 more stays $15 more). A variant can carry the maker's barcode (a shirt in three sizes has three UPCs); see Product Identifiers.
Variants in bins (Advanced Inventory). Each variant with Track ticked has its own inventory item, named after the product and its options, with its own stock and bins, so a red and a blue bumper can sit in different spots. Its stock then shows as a link (on the variant table and the Inventory list) to that item's page, where it's counted, added and moved bin by bin like any item; the variant's SKU or UPC scans straight to it. Sales and refunds of the variant take from and go back to its bins, and pick lists send you to them. A new variant starts in the product's home bin; stock it already had shows as Not in a bin until you put it away. Deleting a variant keeps its item (and history) but makes it inactive.
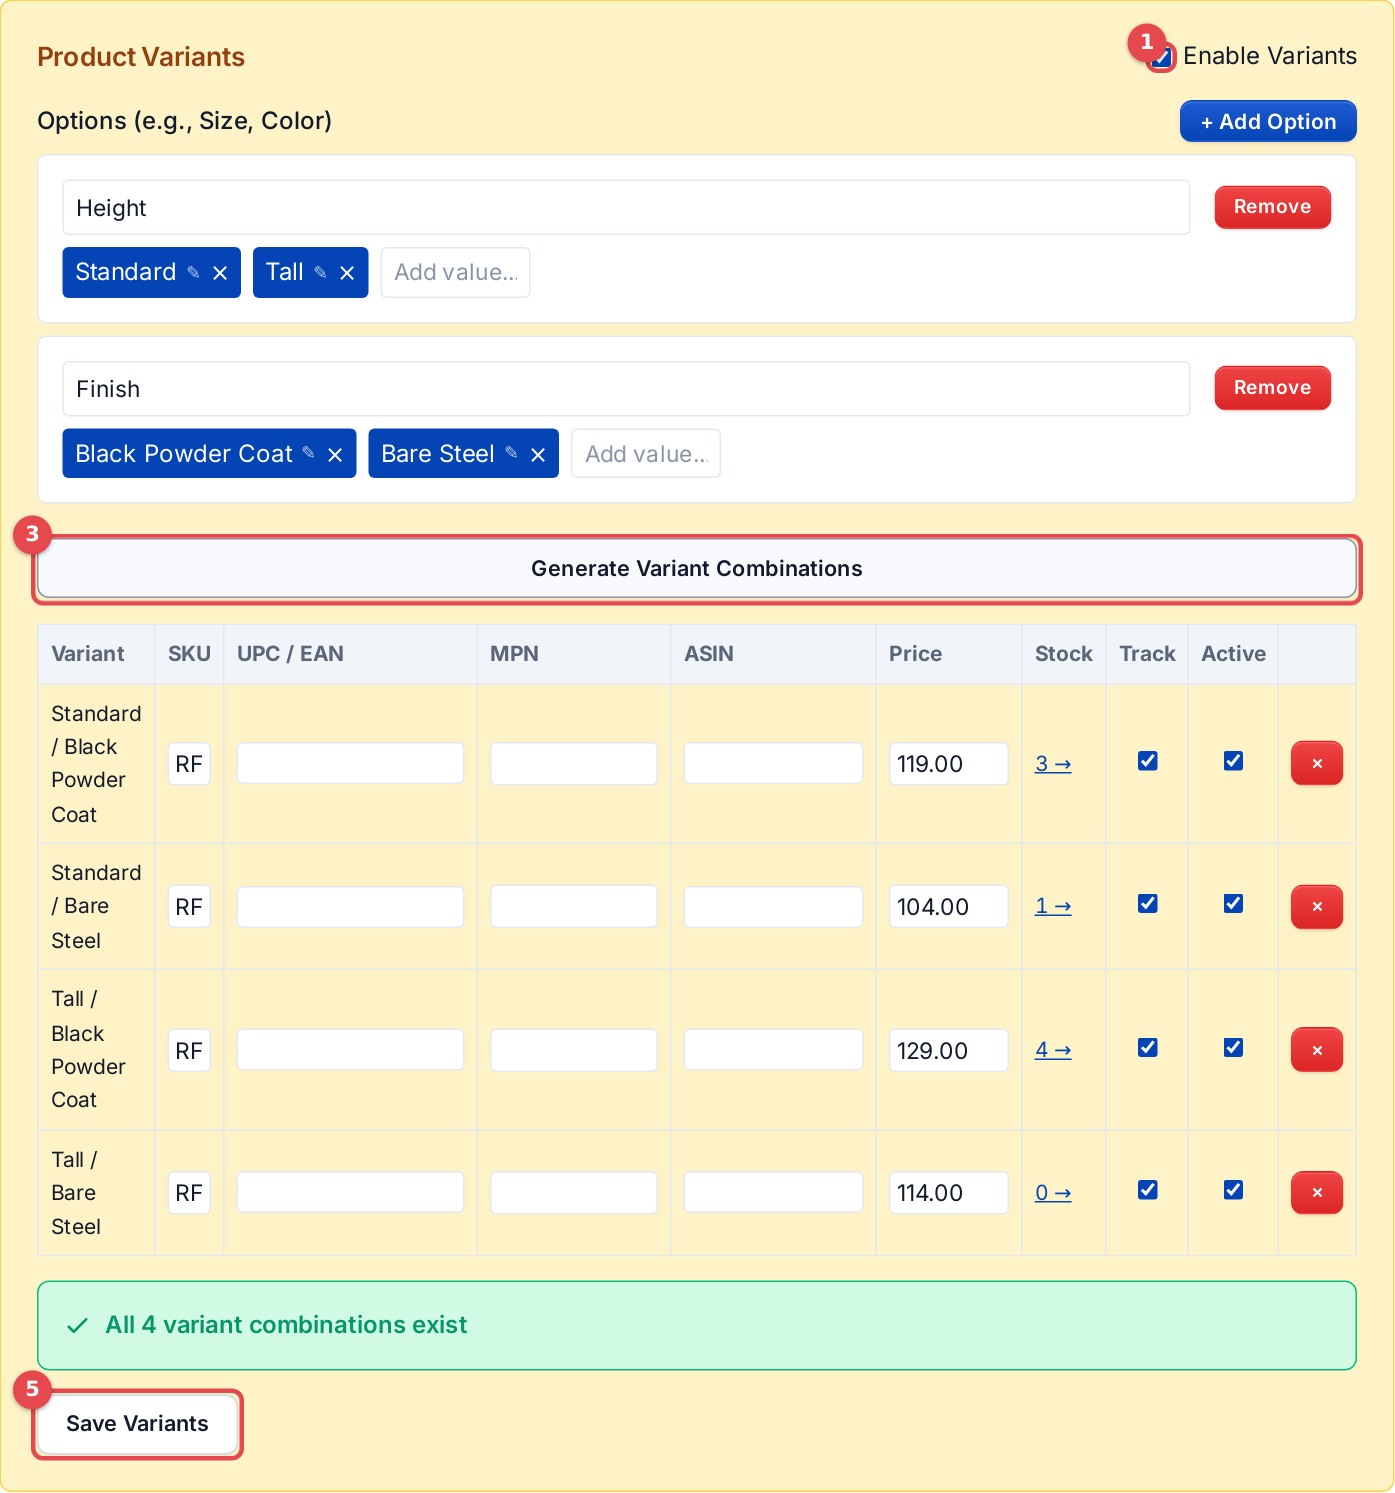 Variant rows after Generate Variant Combinations
Add-ons
Add-ons are optional extras a customer can tick on a product page, such as a mounting hardware kit or a powder coat. Use variants for a choice the customer must make (Driver or Passenger); use add-ons for extras they can take or leave. Add-ons are on every plan.
Each product has its own add-ons, under headings you choose (Mounting, Finish), so five products can each offer a different mix. An add-on is one of three kinds:
- Product: something else you sell, with its own SKU, price and stock. Leave the price empty to charge the product's own price, or enter a different one (a kit that's cheaper as an add-on). Pick a variant to sell one particular option.
- Label: anything else with a price and no stock, like Weld-on tabs. The price is a fixed amount, or %: a percentage of the item's price (with its variant).
- From library: an add-on from your shared add-on library. It follows the library's name and price, so changing it there changes it on every product using it.
Setting up a product's add-ons
- On the product's page, click Add add-ons (or Edit add-ons) in the Add-ons card.
- Click + Add a heading and name it. Choose Pick any (tick boxes) or Pick one (a choice of one); for pick one, Offer "None" keeps the choice optional.
- Click + Add an add-on for each extra and choose its kind. Once per order charges it once however many items are bought, which suits a rush fee. Untick On to hide an add-on or a whole heading without deleting it.
- Use ↑ to move a heading up, then click Save add-ons.
Add a library heading (at the bottom of the page) brings in a whole library heading with all its add-ons; untick the ones this product doesn't offer and save.
The add-on library
Catalog → Add-ons holds the add-ons you offer on many products, such as your coatings or a rush build. Click New library heading, add its add-ons, and click Create heading. Each library heading lists the products using its add-ons. Deleting one stops those products offering its add-ons; orders that already have them keep them.
To give many products the same library add-on, select them in the products list and use Library add-on… → Add (or Remove). It goes under a heading named like the library's, made on each product that doesn't have one.
What the customer sees. The product page shows each group as a heading with its add-ons and their prices above Add to Cart, and a running Add-ons: +$… line as they tick them. An add-on that's out of stock can't be ticked; a made-to-order one shows its lead time. A percentage add-on shows its worked-out price, for example +15% · +$28.35.
In the cart, add-ons sit under their item. Changing the item's quantity changes theirs (a Once per order add-on stays at one), removing the item removes them, and each add-on has its own Remove. The same product with different add-ons is a separate cart line.
Each add-on goes on the order as its own line, listed under the item it was bought with. A product add-on is counted and held in stock like any sale of that product; a label moves no stock and adds no shipping weight.
On the order. Wherever an order's lines are listed (the order page, the customer's order page, order emails, packing slips and the packing station), each add-on sits right under its item, marked ↳ … Add-on. On a pick list a product add-on says which item it goes with (Hardware kit (add-on, with Rear Cubby Panel)); labels aren't picked. A build-to-order item's work orders list its add-ons in their notes: labels as instructions, product add-ons as parts to include.
Refunds, returns and edits. Setting how many of an item to refund, return or keep in an edit fills in its add-ons to match, so they go together. A Once per order add-on is refunded or returned only with the whole item, and stays in an edit while any of the item does. You can still change an add-on's number by hand. Review requests skip label add-ons.
Phone orders, the receptionist and the API. On a phone order, a product's add-ons appear as tick boxes under its line, and each ticked one goes on the order under its item. The phone receptionist and the AI chat know a product's add-ons and their prices, and mention them when a customer asks about extras. The developer API's product page response lists them under addon_groups, and order lines carry parent_order_item_id. POS doesn't offer add-ons yet: ring up a product add-on as its own item.
Reports. Product Sales counts a product add-on as a sale of that product and gives each label its own row. Choose Sold as an add-on to see only what sold as add-ons.
Shipping tab
- Shipping Surcharge ($): an extra fee added to the calculated shipping (handling, oversized).
- Free Shipping: the item is left out of the shipping calculation.
- Ships From: your ship-from address (from Settings → Shipping) or one of your warehouses. It shows on the product page as "Ships from …". New products default to the ship-from address.
- HS / Tariff Code and Country of Origin (2-letter code): needed for international shipping.
- Weight (lbs) and Length (in), Width (in), Height (in): used for shipping rates.
Digital products don't ship, and the tab says so.
Media tab
- Main Product Image: the photo in listings. Rotate it with the arrows or click Crop.
- Add Gallery Images: pick several photos at once. They appear in Product Gallery beside the form, where each has rotate, crop, Set as primary (★) and delete (✕).
- Add Product File (digital and bundle products): see Digital products.
Images can be up to 10 MB each.
Visibility tab
- Visibility: Public (everyone) or Private (only the customer groups and customers you pick under Visible to Customer Groups and Visible to Individual Customers). A private product is hidden from everyone else, and its page shows "not found" to them.
- Active (visible to customers): untick to hide the product from the store without deleting it.
- Featured (shown on homepage): puts the product in the homepage's featured products.
- Sold only as an add-on: hides the product from the shop, search, the sitemap and feeds, but it can still be picked as an add-on on other products. Admin, phone orders and POS still find it. See Add-ons.
Click Save Product at the bottom of the tab, or Save at the top.
Digital products
- Set Product Type to Digital Download (or Bundle (Digital + Physical)).
- Choose a License Type: Personal Use Only, Single Item License or Unlimited Production, and add License Notes if needed.
- On the Media tab, upload the file with Add Product File (up to 100 MB). Save; add more files one at a time the same way.
- The Downloadable Files card beside the form lists every file with its size.
After payment, customers download the files from their order. On the admin order page, the Digital Downloads card shows each download's count and expiry, with Preview Download, Reset Count and Extend 1 Year. Cancelling or fully refunding an order turns its downloads off. A deposit order's downloads unlock only once the balance is paid.
Customer Customization Files
Let customers send you their design files (DXF, EPS, AI, PDF, images) with the order. The section is on the Basics tab of build-to-order products, and of any product that already allows uploads.
- Tick Allow File Uploads.
- Set the options:
| Option | What it does |
|---|---|
| Require at least one file | Customers must upload a file before checkout |
| Max Files | How many files a customer can upload (up to 20) |
| Section Title | The heading in the cart. Blank shows "Upload Your Design Files" |
| Upload Instructions | Help text shown when they upload |
- Save the product.
What the customer sees. The product page tells them to add the product to the cart to upload their files. In the cart they upload files (JPG, PNG, GIF, WebP, DXF, EPS, AI, PDF, DOC, DOCX or ZIP, up to 50 MB each) and can add notes. The files go with the order at checkout.
On the order. Open the order: each item shows its Customer Customization Files to download, and the customer's notes.
Duplicating a product
On the edit page, click Duplicate and confirm Make an inactive copy of this product?. The copy is named "Name (Copy)", is inactive, and keeps the categories, photos and variants. Variant SKUs get "-COPY" added, and UPCs and ASINs are not copied (a barcode belongs to one product). Rename the copy, check its SKUs and barcodes, then tick Active.
On your storefront
- View at the top of the edit page opens the product in your store.
- The catalogue is sorted by Best sellers unless the shopper picks another sort: units sold on paid orders first, then the number of approved reviews, so a store with reviews from before Kaniva still has a sensible order.
- When you are signed in as an owner or admin, the bar at the bottom of the product page has Edit product (see Getting Started).
Product Identifiers
The Identifiers section on the Basics tab (click it to open) holds what Google Shopping, marketplaces and barcode scanners know a product by:
| Field | What to enter |
|---|---|
| UPC / EAN / GTIN | The number under the maker's barcode: 12 digits (UPC), 8 or 13 (EAN) or 14 (GTIN). Spaces and dashes are fine. Kaniva checks the last digit (the check digit) and refuses a number with a typo: "That barcode's check digit doesn't add up — check for a typo." |
| Brand | The maker's brand, for things you resell. Leave it blank for things you make: your store name is used. |
| MPN | The maker's part number. Blank uses your part number. |
| ASIN | Amazon's 10-character product ID, if it's listed there. |
| Condition | New (the default), Used or Refurbished. |
All of them are optional. Products with options can have a UPC, MPN and ASIN per variant, in the variants table.
- Same barcode twice: if another product or variant already has the barcode, Kaniva saves it anyway and shows a warning naming the other one. Scanning that barcode then offers both.
- UPC and EAN are the same number: a 12-digit UPC such as 012345678905 is the 13-digit EAN 0012345678905 with a zero in front. Kaniva treats them as one, so it doesn't matter which one you type or which one a scanner sends.
- Duplicating a product copies brand, MPN and condition but not the UPC or ASIN, which belong to one product.
- Finding a product by barcode: type or scan the UPC into the admin Search, the Products list search, the Scan box or the POS register.
- API: the products API returns
gtin,brand,mpn,asinandcondition, accepts them on create and update, andGET /api/v1/admin/products?gtin=…finds a product by its or a variant's barcode.
Google Shopping feed
Turn the feed on at Settings → General (Enable Product Feed) and give Google Merchant Center its address. For each product the feed sends:
- gtin: the product's UPC/EAN, when it has one
- brand: the product's Brand, else your store name
- mpn: the product's MPN, else your part number
- condition: the product's Condition (new when not set)
- identifier_exists: yes when the product has a UPC, or both a Brand and an MPN; otherwise no, which is what Google asks for custom-made and handmade goods
So: for things you resell, enter the UPC (or brand and MPN) so Google can match the listing; for things you make, leave the identifiers blank. The feed sends one entry per product, using the product's own UPC (not its variants').
Print Logo
Settings → Theme, Print logo: upload a black-and-white version of your logo (PNG, JPG or GIF, black on white or transparent). POS receipts, product / part / bin labels and packing slips use it. Thermal printers print dark backgrounds as solid black, so a print logo looks much cleaner than a color website logo. Without one, receipts and labels use your website logo and packing slips show your store name only. Settings → POS → Show store logo on receipts turns the logo off on receipts.
Printing Product Labels
Print 3" × 1.5" thermal labels (or small NIIMBOT labels) for bags and shelves: the product name, a barcode of the part number, and a footer with your website, phone and the date.
- One product: open it and click Print product label.
- Several: tick them on the Products list and choose Print product labels in the bar above the table.
On the label page, pick a layout (Standard, With logo using your store logo, or Big part number for bins and shelves), set how many copies of each, whether to show the price and date, and edit the footer, then click Print: it prints the PDF version, which comes out sharper on thermal printers than printing the web page. Save as default keeps the layout, footer, price and date as the store's starting point (the options you used last come first for you; see Scan and print); the footer starts as your custom domain and contact phone until you save one. In the print dialog pick your label printer, set the paper to 3 × 1.5 in (76 × 38 mm), margins None and scale 100%.
PrintNode: if PrintNode is on (Settings → Shipping), the label page lists your PrintNode printers. Pick the 3" × 1.5" label printer (not the 4×6 shipping printer) and click Send to printer; the labels print without a print dialog, and this device remembers the printer for next time (a new device starts with the one on Settings → Printing). Set that printer’s default paper to the 3 × 1.5 in label in the PrintNode client or the printer driver. Download PDF saves the same labels as a PDF.
The barcode is the product’s part number (or the variant’s SKU), the same code the POS register looks up, so a scan rings the item up. Products with no part number, or one too long for a 3" barcode, are flagged with a link to fix them; a short number like 2545 scans best.
Barcode: UPC / GTIN prints the product's (or variant's) UPC/EAN instead, with its digits under the barcode, for shelf labels that match the maker's packaging. It prints as a Code 128 barcode, which scanners and the register read the same as the maker's. A product without a UPC keeps its part number, and the label page says so. The choice is saved with Save as default.
The same label page prints bin labels and item labels for Advanced Inventory (see Locations and Items). The PrintNode label printer you pick is shared by all three, and each kind keeps its own saved defaults.
NIIMBOT labels (50 × 30 and 40 × 30 mm)
For small labels on a NIIMBOT printer (for example a B1 at a trade show), pick Size: 50 × 30 mm (NIIMBOT) or 40 × 30 mm (NIIMBOT) on the label page. This works for product, item and bin labels, and Save as default keeps the size.
- Layouts: Standard (name, barcode, part number, and the price if ticked) and Price tag (name, a big price and a small barcode) for products; Standard and Big SKU for items; Bin for locations. The footer and date print on 50 × 30 mm labels only; 40 × 30 mm has no room for them. The logo isn't printed on small labels.
- Preview: the page shows each label exactly as the printer will print it, dot for dot (203 dpi, black and white only).
- Print to NIIMBOT (Chrome on Android, or Chrome/Edge on a computer with Bluetooth): turn the printer on, tap Print to NIIMBOT and pick the printer in the list. Each label prints with its Copies count; the page shows progress ("Printing 3 of 12…") and Cancel stops after the current label. If something's wrong the page says so in plain words (Bluetooth off, printer not found, lid open, out of labels). Close the NIIMBOT app first if it is connected to the printer, since the printer takes one connection at a time. Android asks Chrome for the Nearby devices permission the first time.
- Darkness (1–5, default 3) sets how dark the printer burns. Try 3 first; go up a step if bars or text look faint or broken, down a step if they run together. The setting is remembered on that phone.
- Other phones: on an iPhone, in Firefox, or whenever you'd rather use the NIIMBOT app, tap Download image under each label and open the image in the NIIMBOT app (set the copies there).
- Print, Download PDF and Send to printer still work: the PDF has one 50 × 30 mm (or 40 × 30 mm) page per label.
Load 50 × 30 mm (or 40 × 30 mm) labels with gaps in the printer before printing.
Printing one product after another (remembered options)
The label page is built for printing labels for one product after another, for example at a trade show or while stocking shelves:
- Remembered options: the size, layout and options you last showed, printed, sent or downloaded are remembered for you, separately for product, item and bin labels, on any device you sign in on. The next product you open labels for (from its page or Print product labels on the Products list) starts from them, so it is usually just Print to NIIMBOT. Save as default sets the starting point for everyone in your store who hasn't printed that kind of label yet.
- Nothing reloads. Changing the size, layout, barcode, price, date, footer or copies, and Save as default, update the page in place, so a NIIMBOT connected with Print to NIIMBOT stays connected while you're on the page. Only switching between the 3 × 1.5 in thermal size and a NIIMBOT size reloads it.
- At a NIIMBOT size the page shows the product and its copies, the options, Download PDF / Save as default, then Print to NIIMBOT (with Darkness and Position), in the same place as the PrintNode box for 3 × 1.5 in labels. Position nudges the print left or right on the roll; if labels come out off-centre, change it by a step and print one. It is remembered on that phone, and the right value can change when you change rolls. The PrintNode panel and the PDF Print button are for 3 × 1.5 in labels only.
Chrome asks you to pick the printer again each time you open the label page. To have it reconnect by itself, turn on chrome://flags → Web Bluetooth new permissions backend on the phone.
Import from Shopify
Bring your Shopify catalogue into Kaniva, either straight from your Shopify store or from Shopify's product export. Open Catalog → Products and click Import. The page has two tabs: Shopify and Kaniva spreadsheet (the older import that uses Kaniva's own CSV template).
Connect your store (import without a file)
Connecting lets Kaniva read your products, variants, prices, costs, stock and photos straight from Shopify. Kaniva only reads; nothing is changed in Shopify.
- In Shopify admin, open Settings, then Apps and sales channels, then Develop apps. If Shopify asks, click Allow custom app development
- Click Create an app and give it a name such as Kaniva import
- Open Configuration → Admin API integration, tick the scopes read_products and read_inventory, and save
- Click Install app. Under API credentials, reveal the Admin API access token and copy it. Shopify shows it only once
- In Kaniva, on the Shopify tab, fill in Connect your Shopify store: your store address (
your-store.myshopify.com; you can also paste the address from your browser while in the Shopify admin) and the token, then click Connect and test - Kaniva checks the token and the scopes before saving. If something is wrong you'll see why: a token Shopify doesn't accept, a missing scope, or no store at that address
Once connected, the tab shows Connected to your store with three buttons:
- Import from connected store reads all your products and then shows the same preview as a file upload (steps 2 and 3 below). A few hundred products take a few seconds; a few thousand can take a few minutes, and the page refreshes itself while it waits
- Test connection checks the token still works
- Disconnect deletes the token from Kaniva. You can also uninstall the app in Shopify
The token is stored encrypted and is never shown again. Up to 5,000 products and 20 photos per product are read per import. Cost per item comes across as with the file (Advanced Inventory), and stock always comes across, unlike newer Shopify exports.
1. Export from Shopify
- In Shopify, open Products and click Export
- Choose All products and CSV for Excel or Plain CSV file
- Shopify emails you a link. Download
products_export.csv
2. Upload and preview
- On the Shopify tab, choose the file (up to 20 MB) and click Upload and preview
- The preview shows how many products are new, how many are already in your store, how many will be skipped, and how many variants and photos the file has. It also lists the first 20 products and any warnings
- Nothing is changed yet. Click Discard this preview if the file isn't right
3. Import
- Tick Update products that already exist if you want existing products updated. Leave it off to skip them
- Click Import n products (or Start import). The import runs in the background; the page shows its progress and you can leave and come back
- When it finishes, the page shows what was created, updated and skipped, and any warnings. Past imports are listed on the Shopify tab
What comes across
| Shopify | Kaniva |
|---|---|
| Handle | The product's URL (slug) |
| Title, Body (HTML) | Name and description (formatting kept, unsafe HTML removed) |
| Type (or the last part of Product Category) | Category, created if it doesn't exist |
| Tags | Meta keywords |
| SEO Title, SEO Description | SEO title and meta description |
| Status / Published | Draft and archived products are imported hidden |
| Option names and values | Product options and variants |
| Variant Price, Compare At Price | Price. For products with variants, the base price is the cheapest variant and each variant's price difference is kept |
| Variant SKU | Part number (single products) or variant SKU |
| Variant Barcode | UPC / EAN of the variant (or of the product, when it has no options). A barcode whose check digit doesn't add up, or that Excel turned into something like 1.23457E+11, is left out and listed in the warnings |
| Vendor | Brand, unless the vendor is your own store name (Shopify fills it in with the store name for things you make). A brand you've already set is never replaced |
| Variant Inventory Qty, Inventory Tracker | Stock and "track inventory". Newer Shopify exports have no quantities; stock is left as it is |
| Variant Grams | Weight in pounds |
| Cost per item | Unit cost on the inventory item, when Advanced Inventory is on |
| Image Src, Variant Image | Main photo, gallery photos and variant photos |
Not imported: gift cards, and tax and fulfilment settings.
Good to know
- Matching: a product counts as already in your store if its URL matches the Shopify handle, or its part number or a variant SKU matches the first SKU in the file
- Updates only change what the file has. Empty cells and missing columns leave the product's current value alone. Variants are matched by SKU or option values and never deleted
- Photos are downloaded, resized to your store's image size and stored like uploaded photos. Up to 250 photos are fetched per import; import the file again with updates ticked to fetch the rest. Products that already have photos keep them
- SKUs must be unique across variants. A variant whose SKU is already used by another product is imported without a SKU and listed in the warnings
Supplier feeds
A supplier feed keeps your stock (and cost, and if you want, price) in step with a file your supplier publishes. Go to Catalog → Supplier Feeds. Every store has it.
Getting a feed from your supplier
Ask your supplier or distributor for their inventory feed, stock file or data feed. Most send one of these:
- A web link to a CSV or Excel file that they update through the day (often with a key in the link, which Kaniva stores encrypted)
- FTP or SFTP login details: a server name, username, password and the path of the file (for example
/outgoing/inventory.csv) - A file by email. Choose I'll upload it and upload each new file on the feed's page
The file needs one row per product with at least a SKU column and a quantity column. Cost, price and MAP (minimum advertised price) columns are optional. CSV (comma, semicolon, tab or pipe separated, any Excel "CSV" encoding) and Excel .xlsx (first sheet) files up to 50 MB work.
Setting up a feed
Only the owner and admins can set up, change or delete a feed, because it holds your supplier login. Staff can see feeds, run them and upload files. Changing a feed's server, port or username removes its saved password, so type the password again.
- Click New feed, give it a name and choose where the file comes from. With Advanced Inventory you can also pick the supplier
- Click Save and test fetch. Kaniva downloads the file and shows its first rows
- Columns: pick which column is the SKU and which is the quantity (and cost, price or MAP if the file has them). If the file has no header row, untick The first row holds column names and columns are chosen by letter (A, B, C…)
- Match on: the file's SKU is usually your SKU, meaning a product's part number or a variant's SKU. With Advanced Inventory you can instead match the supplier's SKU saved on your inventory items (limited to the feed's supplier when one is chosen). If the supplier's file lists products by barcode, choose UPC / GTIN to match the UPC/EAN on your products and variants: a UPC in the file matches the same number saved as an EAN (with a leading zero), and back. Tick Ignore upper/lower case if the supplier's capitalisation differs from yours. Leading zeros always count when matching SKUs
- Rules (below)
- Schedule: every hour, every 6 hours, once a day at a time you choose, or only when you click Run now. Tick Run on this schedule
- Click Dry run to see how many rows the file has, how many products would match and change, and the first SKUs it can't find. Nothing is changed. Then click Save
Rules
- Stock: the product's stock is set to the supplier's quantity. Hold back subtracts a few units (never below 0) so you don't sell their last one; Show at most caps the number. Quantities like
1,200,>50and50+are understood, and "Out of stock" counts as 0 - Products missing from the file: Leave its stock alone (the default) or Set its stock to 0. Setting to 0 only ever touches products this feed matched on its last run, never anything else in your store
- Cost: goes to the inventory item's unit cost when Advanced Inventory is on (and is recorded against the supplier). Without it, costs aren't stored
- Price: off unless you tick Update my selling prices from this feed. The price is either the file's price column or the file's cost × your markup (for example 1.6), optionally ending in .99. A price is never set to 0 or less, and never below the MAP column when you've mapped one. For variants, the variant's price difference is moved so its final price matches
With Advanced Inventory, stock changes are recorded as stock count movements with the note "Supplier feed: name", so the movement history and location totals stay right.
When a file looks broken
- If the file can't be downloaded or read, or its SKU column is missing, the run fails and nothing is changed
- If the feed says Saved connection details can't be read, its saved link or password was stored on another server (for example after your store's data was copied). Open the feed's Settings and enter the link or password again. Until then its runs fail with that message and nothing is changed
- If the file has less than half the rows of the last one applied, the run is held and nothing is changed: a cut-off download or a broken export would otherwise wipe out your stock. The feed page explains what happened; if the supplier really did drop those products, click Apply anyway (once, for that file)
- If the file is exactly the same as the last one applied, the run is skipped. Saving the feed's settings makes the next run apply the file again
Feed page
- Run now fetches the file straight away; Pause/Resume stops and restarts the schedule
- Upload and apply applies a file you have on your computer with the feed's columns and rules
- Run history lists every run with how many rows, matches and changes it had. Details shows its notes and every SKU it couldn't match
- SKUs not found lists SKUs in the supplier's file that aren't in your store. That's normal for products you don't sell; if you do sell one, give it the same SKU and the next run picks it up