Suppliers, purchasing and receiving
Buying stock goes in three steps: put what you need on the Purchase List, order it (with a purchase order, or just by marking it ordered), and check it in on Inventory → Receiving when it arrives. Received stock goes into each item's home bin. All of this needs Advanced Inventory (see Inventory). For the whole flow in one place, see Order and receive stock.
Suppliers
Inventory → Suppliers lists your suppliers with their contact details, how many items you buy from them and their open POs.
Adding a supplier
- Click + Add Supplier.
- Fill in **Supplier Name *** and, if you like, Supplier Code (a short code; left blank, Kaniva makes one), Contact Name, Email, Phone, Website, Address and Notes.
- Set the dropship options if this supplier ships orders for you.
- Click Create Supplier.
Payment terms aren't on the supplier: set them on each purchase order's Edit page.
A supplier's page lists the items you buy from them and their purchase order history. + New PO makes a purchase order from this supplier's lines on the Purchase List.
Items and suppliers
Each item has one Primary Supplier, a Supplier SKU (their part number), a Supplier URL for reordering, a Lead Time (days) and a Min Order Qty. Set them on the item's Edit page. Purchase orders are made per supplier, so give every item you buy a supplier. A supplier with items can't be deleted; move the items to another supplier first.
Purchase List
Inventory → Purchase List is where you collect what to order. The sidebar shows how many lines are on it.
Adding to the list
- Add low-stock items at the top of the Purchase List adds every item at or below its reorder point (Trigger Level) at its restock quantity, in one click. Items made in your shop (with an active BOM, or set to restock by printing) are left out. It says how many it added and how many it skipped.
- Inventory → Items: + Purchase List on a row adds that item at its restock quantity. Tick several (or Select all) and click Add to purchase list to add them together. An item already on the list shows On list and isn't added twice.
- An item's page: set the quantity in the reorder box and click Add to Purchase List.
- The Purchase List's Quick Add box: pick the Item, type the Quantity and click Add to List.
- A kanban card: scanning a card's QR code offers Add to Purchase List (see Kanban Cards).
- Alerts: the stock alert email's Add to purchase list button opens a page for the item that shows its stock and whether it's already being ordered. Click Add to purchase list there and Kaniva adds it and shows the list. Opening the link on its own changes nothing.
- A work order that's short of parts: Add short parts to purchase list under its shortages adds each short part for what it's short of (see Manufacturing).
Nothing is ordered twice. An item counts as already being ordered while it is on the Purchase List, on an open purchase order (any PO not yet received or cancelled, drafts included; drop-ship POs don't count), or on an order you marked as ordered without a PO. Add low-stock items, the Add to purchase list button on Inventory → Items, the alert email's button and Add components skip it and tell you ("1 already on it", "1 already on order"). A kanban card scanned for an item that's already on an open PO adds nothing, says which PO it's on, and waits with that PO so it comes back when the PO is received. A quantity you type in yourself (the reorder box, Quick Add) is still added, with a note when the item is already on order.
Items with a Bill of Materials: if the item you add is manufactured (it has a BOM), Kaniva asks whether to add the finished item (Add finished item) or its components (Add components (raw materials)). Choosing components explodes the BOM all the way down, through any sub-assemblies that have their own BOM, and works out what you need of each purchasable raw material (component-per-unit × your quantity). Only the components you're short of, or that would drop to their reorder point, go on the list, each for what it's short of (at least its restock quantity). Components with enough stock, or already being ordered, are skipped and counted in the message. The same button is on a BOM's page as Order short components. When a kanban card for a made item is scanned and you choose components, the card goes straight back on its hook once its parts are listed (the message says where); scanning it again won't order the same parts twice. Items without a BOM are added directly, with no prompt.
Working the list
The Items to Order table shows each line's current stock, quantity to order, unit price and estimated cost. Change a quantity in place, or remove a line with ×. By Supplier groups the lines with a running total for each supplier.
- Generate PO under a supplier makes a draft purchase order from that supplier's lines. Lines with No supplier can't go on a PO: give the item a supplier first.
- Mark All as Ordered skips the PO: every line is recorded as ordered and waits on Inventory → Receiving (see Orders without a PO).
- Clear List empties the list.
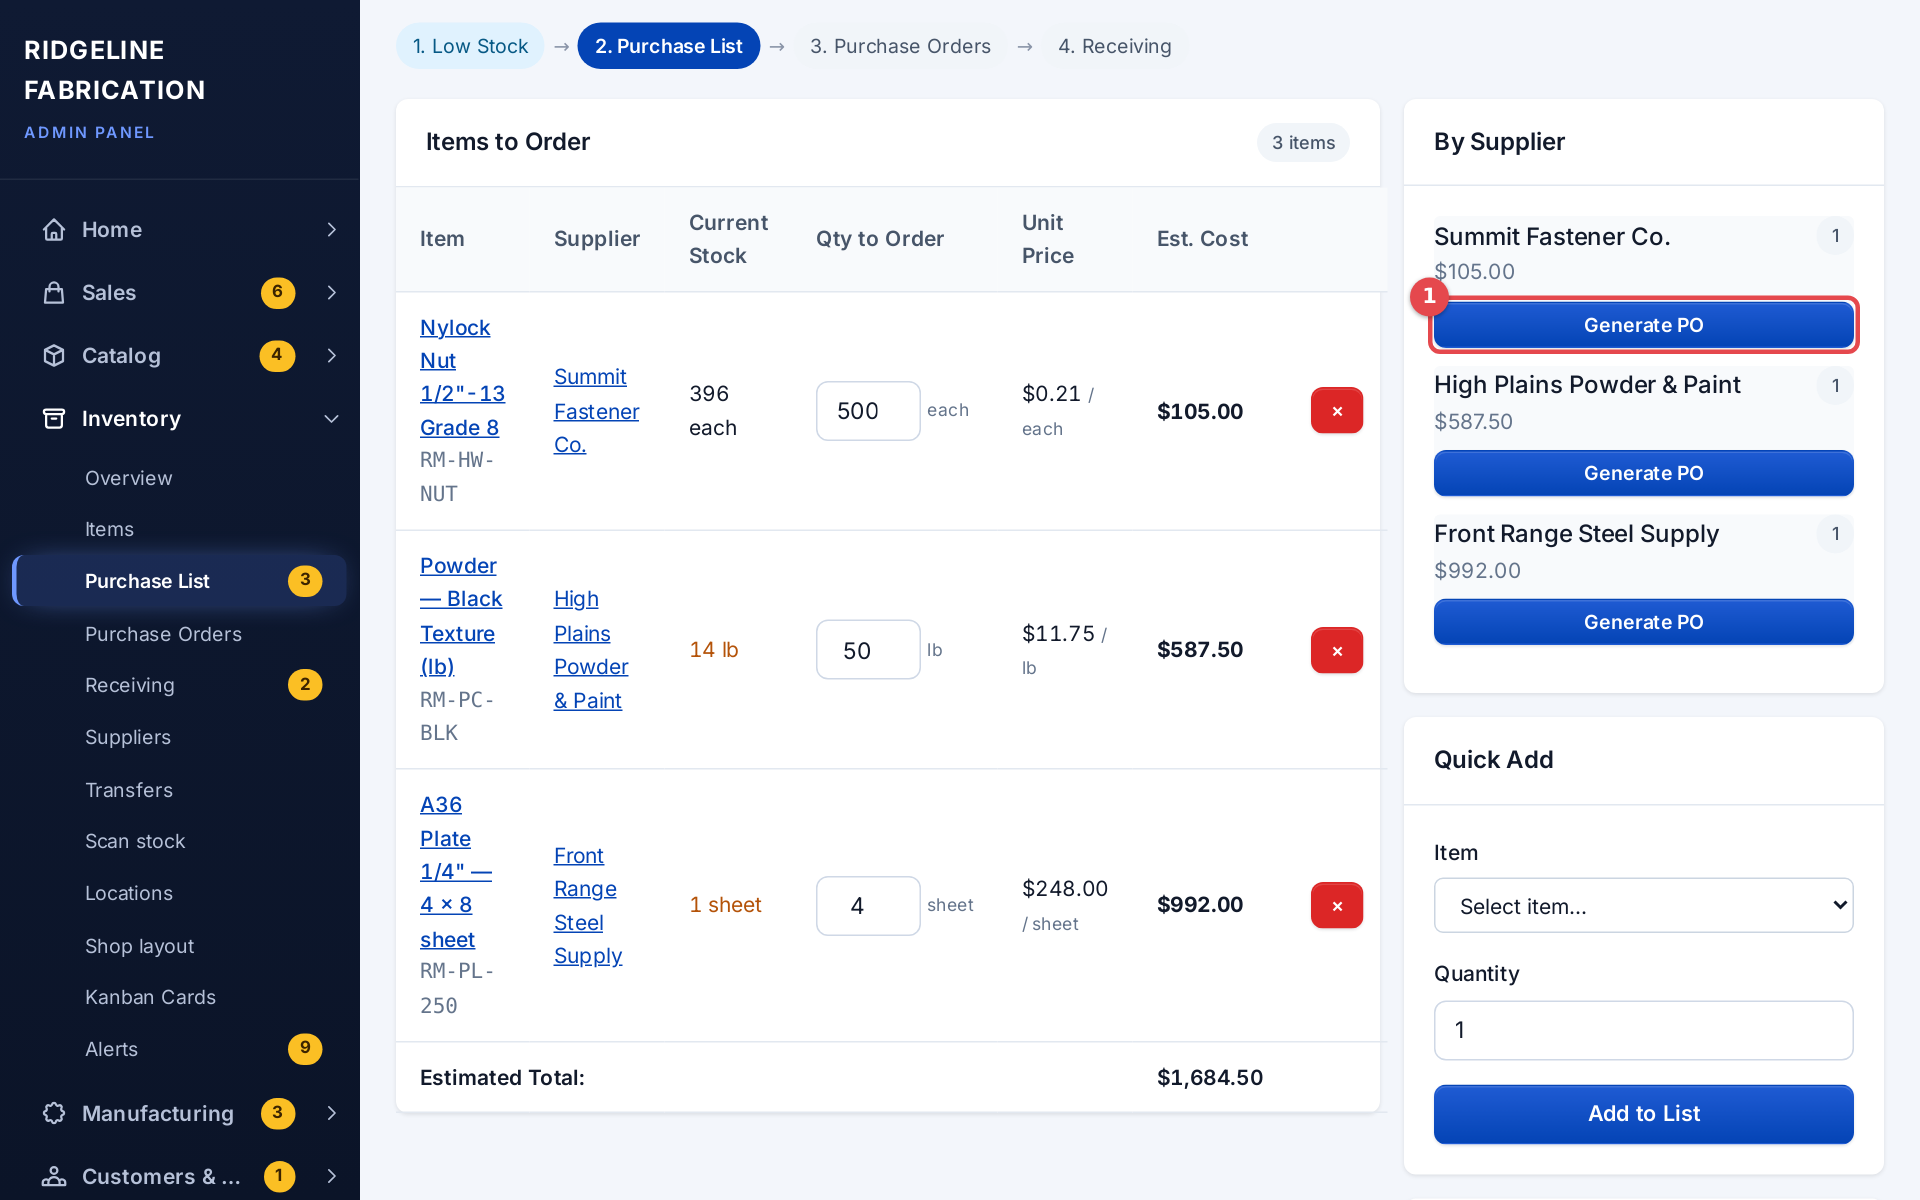 The Purchase List grouped by supplier
Purchase Orders
Inventory → Purchase Orders lists your POs. Filter by status, supplier and type. Create from Purchase List opens the Purchase List, and Receiving History lists every receipt against a PO.
Where POs come from
There's no blank "new PO" form. A PO is made:
- from the Purchase List, with Generate PO under a supplier (or + New PO on the supplier's page), or
- from a customer order: on the order's page, + Create Purchase Order lists the order's items that have a supplier. Pick the items, choose Ship to Warehouse or Drop Ship to Customer, and click Create Purchase Order(s). Kaniva makes one PO per supplier.
Expected date. A PO made by Kaniva (from the Purchase List, a customer order, or Duplicate Order) gets an Expected Delivery Date of today plus the longest Lead Time (days) among its items: a PO arrives when its slowest item does. Lead time is set on each item; suppliers don't have one. If the PO still has no date when you click Submit or Mark as Sent, it's filled then, counting from the order date. A date you typed is never changed, and with no lead times the date stays empty. The item's page shows the earliest expected date as Expected under On order.
PO statuses
| Status | Meaning |
|---|---|
| Draft | Just made. Change it freely |
| Submitted | Ready to send to the supplier |
| Sent | Sent to the supplier |
| Partial | Some of it has been received |
| Received | All of it has been received |
| Cancelled | Cancelled |
Sending a PO
- Open the draft PO and click Submit.
- Click Send Email to Supplier to email it, or Mark as Sent if you ordered by phone, website or your own email.
Once sent, Resend Email sends it again. Print and Download PDF give you a copy.
Editing a purchase order
Open a PO and click Edit (available until the PO is fully received or cancelled). You can change the Expected Delivery Date, Payment Terms, Ship To and Bill To addresses, Shipping and Tax, Notes for Supplier (printed on the PO) and Internal Notes (never shown to the supplier). You can also change the line items:
- Change the quantity or unit cost of any existing line.
- Add an item: use the Add an item to this PO row below the lines: pick an item, set quantity and cost, and click Add line. Add as many as you need before saving.
- Remove a line: tick the Remove box next to it. Lines that already have received quantity can't be removed, and a line's quantity can't be lowered below what's been received.
Click Save Changes and the PO totals recalculate.
Cancelling a purchase order
Open the PO and click Cancel Order. Kaniva asks whether to return the unreceived items to the purchase list (ticked by default):
- Ticked: every line's unreceived quantity is put back on the purchase list so you can re-order it. Handy if you cancelled by mistake. Already-received quantity is not returned.
- Unticked: the PO is cancelled and nothing is added to the purchase list.
Cancelling also releases any linked kanban cards and sales-order items.
After a PO is received
A received PO has Duplicate Order, which makes a new draft PO with the same lines (handy for regular orders), and Create Bill, which turns it into a bill in Accounting.
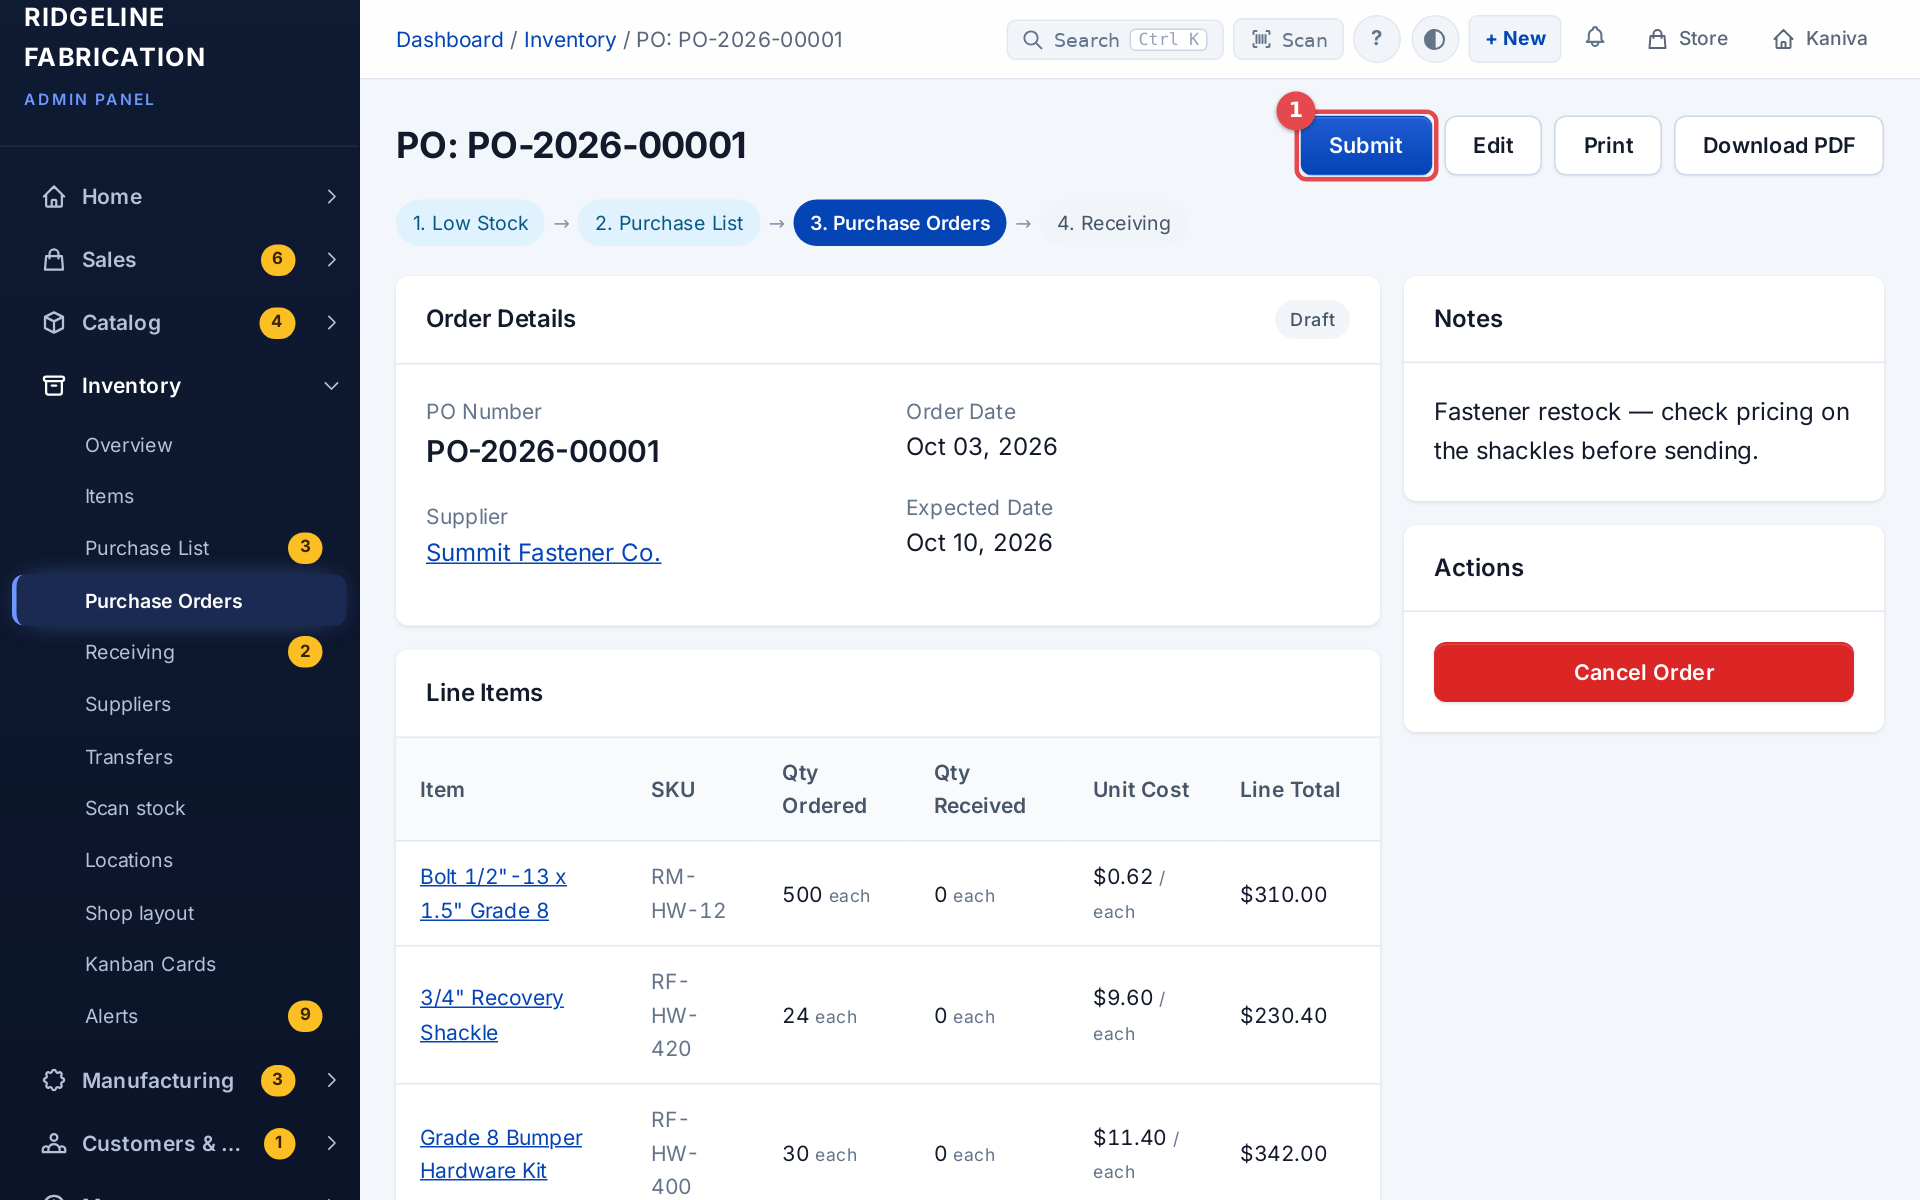 A purchase order with Submit and its line items
Receiving
Inventory → Receiving shows everything you're waiting for: Purchase Orders Awaiting Receipt, then orders made without a PO, grouped by supplier, then Recent Receipts. The sidebar shows how many are waiting.
Receiving a purchase order
- Click Receive on the PO (or Receive Items on the PO's page).
- For each line, type Receiving Now. Change New Cost if the price changed; it becomes the item's unit cost.
- If your store scans supplier invoices, Scan Supplier Invoice (Optional) reads the invoice from a phone photo to fill in the bill.
- Add Receiving Notes if you like and click Receive Items.
The stock goes into each item's home bin. If only part of an order came, receive what arrived: the PO goes to Partial and stays on the Receiving page until the rest comes. When the receipt finishes a line ordered from a kanban card, the PO's page lists Hang these cards back with each card and where it hangs; a card on a part-received line stays On Order until the balance arrives (see Receiving a PO). Scanning a PO that can still be received opens Receive Items directly. To put stock somewhere other than the home bin, use Move on the item's page or the Scan page.
Seeing what was received: each PO's page has a Receipts card listing every receipt against it (date, item, quantity, who received it). Open in Receiving History shows the same receipts in Receiving History, filtered to that PO, with a Back to PO-… button to return. In Receiving History, each receipt's PO number links to its PO. PO History on the Receiving page opens it too.
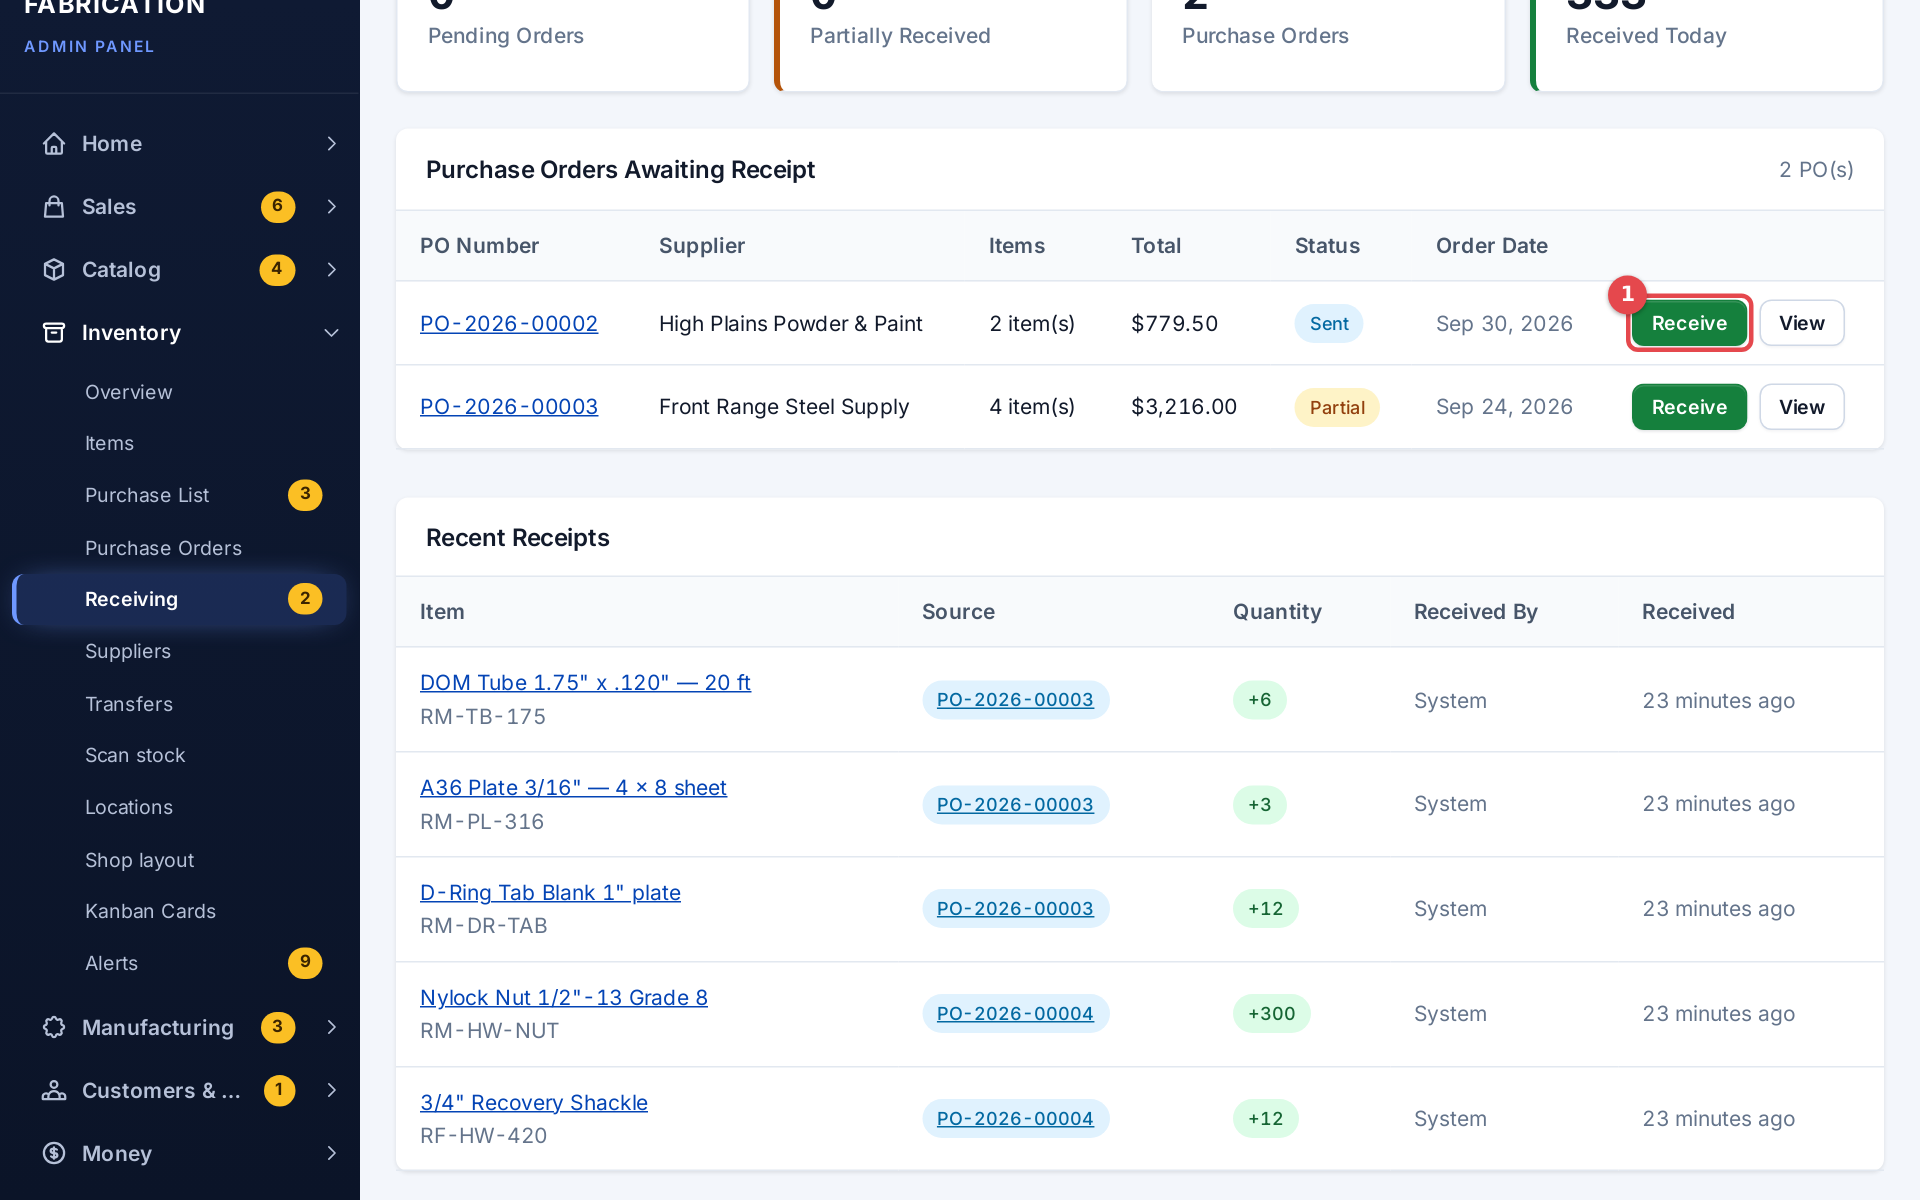 The Receiving page with a PO waiting
Orders without a PO
Mark All as Ordered on the Purchase List, and I Ordered This on a kanban card's reorder page, record an order without a purchase order. These show on the Receiving page under their supplier, and as Quick Order in Recent Receipts. A kanban card ordered this way stays On Order until the whole quantity is received or the order is cancelled, then goes back to Active; the message after receiving says which card to hang back and where.
- Receive All on a row receives the whole quantity into the home bin.
- Details lets you receive part of it (Quantity to Receive, then Receive Stock) or cancel it (Cancel Order).
Quick Order History lists everything received this way.
Drop-ship purchase orders
A drop-ship PO is for items the supplier ships straight to your customer. They never pass through your shop, so they don't change your stock. A PO made from an order with Drop Ship to Customer is marked Drop Ship, and so are the POs made by Dropshipping.
On the Receiving page a drop-ship PO has Mark Shipped instead of Receive, so the items can't be received into your stock by mistake. To close it:
- Open the PO and click Mark as Shipped.
- Enter the supplier's Tracking Number, Carrier and Tracking URL.
- Click Confirm Drop Ship Complete.
No tracking available? Tick No tracking number available — mark shipped anyway at the top of the form. The tracking inputs hide and the PO closes without tracking. Use this for freight, customer pickup, or any drop-ship the supplier doesn't give a trackable number for. Tracking already on the customer order (from another shipment) is kept.
What happens:
- The PO becomes Received, with no stock change.
- The tracking is copied to the linked customer order (skipped if you marked it shipped without tracking).
- If everything else on the order is done (boxes shipped, other drop-ships done), the order completes. Items you ship yourself still need to be packed first: an order with in-house items stays open until they are.
Dropshipping
Products your supplier ships for you can go to them automatically when the order is paid. The supplier gets the order with a packing slip in your name and a private link to add the tracking number. You don't have to create or send the PO yourself.
Setting up a supplier (on the supplier's Edit page, under Dropship orders):
- Send automatically (the default) sends each paid order to the supplier straight away.
- Hold for my approval waits for you. You get an email, and the order shows a Send to supplier button.
- Orders email is where dropship orders go. Leave it blank to use the supplier's main email.
Marking a product: on the product's Inventory tab, choose the supplier and tick Dropshipped by this supplier — orders go straight to them.
When an order is paid:
- Kaniva makes one drop-ship PO per supplier for the dropshipped items, with the customer's address as the ship-to. Items you ship yourself stay on the order and go through packing as usual.
- The supplier's email is titled New order to ship: {your store} PO-…. It lists the items with the supplier's SKU and the ship-to address, and has a big Add tracking button. Two PDFs are attached: the PO for their records, and a packing slip in your store's name with no prices to put in the box.
- Variant orders show the chosen options and SKU on the PO.
- Orders for local pickup or delivery, and orders with no shipping address, are not forwarded.
- Each order is forwarded once, even if the payment is recorded twice.
The supplier's tracking link: no login. The supplier picks the carrier (UPS, USPS, FedEx, DHL, Canada Post or Other), enters the tracking number and, if they want, a tracking link and a note. Saving it:
- marks the PO shipped (the same as Mark as Shipped)
- copies the tracking to the order
- sends the tracking to Shippo, so delivery updates come in, and to PayPal for a PayPal order (as tracking you enter yourself does)
- emails your customer once. If an order step email goes out, it replaces this one. On a mixed order the email says part of the order shipped.
The supplier can correct the tracking for 30 days without the customer getting another email. Old or wrong links show a "This link isn't active" page.
On the order page: a Dropship card shows each supplier and their status:
- Waiting for approval has a Send to supplier button.
- Not sent means the email failed or the supplier has no address. Fix it and press Send to supplier.
- Sent has Resend email and Copy tracking link (to pass on by phone or text).
- Shipped shows the carrier and tracking number.
An order a supplier already has can't be cancelled: suppliers don't take back an order they've confirmed. Refund it instead (More → Issue refund…). Refunding it in full cancels POs that never reached a supplier. The ones a supplier has stay open, and they aren't told unless you ask:
- Tick Ask {supplier} not to ship on the refund form, or click Ask {supplier} not to ship on the order's Dropship card afterwards. Kaniva emails them once (Cancelled, please don't ship), and the card says Emailed {supplier} on {date} not to ship this order.
- It's a request: their tracking link keeps working, with a note that the order was cancelled, so if it had already gone out they can still add the tracking. If the email can't be sent, the card says Tell {supplier}: this order was already sent to them.
Purchase Orders list: the type filter shows Drop ship (all) or forwarded POs by status: waiting for approval, not sent, sent with no tracking, shipped or cancelled.
Daily digest: at 8 AM you get an email listing dropship orders sent more than 2 days ago that still have no tracking. If there are none, nothing is sent.